I've had such a great response to the Granny Organizers I have made, and so many questions about how I make them and what pattern I used that I decided to write a post about it.
I first saw these Grannies on Pinterest. This was the specific pin that I just loved and it touted a free pattern! What's not to love about that!? Isn't she adorable? The hair on this one is sooo pretty, but I couldn't figure out what stitch was used for the cap.
When I searched for the pattern, the link led to this site.
Although the first granny pictured in the site was cute, the pattern did not have instructions for the granny I wanted to make. So I realized that I would have to get a bit creative to produce the Granny I really wanted in the pic above. I downloaded the pattern and studied it to determine what changes I would need to make. The pattern is well written and easy to follow, and I saw that the main changes I wanted would be the face and hair. Simple enough, right?
The pattern is crocheted from the head down. And the hair is a separate part of the pattern and attached after the main doll is finished. So my challenge was to make a different hairstyle. The face changes were easy. I simply did not do the sculpting on the face, but left it nice and round. The nose is made with 1 bobble stitch that is sewn to the face.
So I followed the pattern as written for the basic doll and the apron. The first doll took me about 30 hours of work to complete including time spent searching and designing the hairstyle with the curly cues. I ended up making a fairly plain wig cap and attaching multiple curly cues made with sc. This hairstyle was 'OK' but I just couldn't be satisfied with it considering the time it took to make it.
The loopy hairstyle was still time consuming, but I was much more satisfied with it. It gave granny a sweet, familiar look from an old sitcom I used to watch called 'Mamma's Family.' (Anyone remember that show?)
The glasses really make this granny shine! I couldn't find any online or at the craft stores that I liked, so I made my own. I used 18 gauge galvanized steel wire that I shaped into glasses. Then I wrapped the glasses with coordinating color yarn. I suppose you could wrap them with almost any pretty fiber or tape, but I like to use what I have handy. I did try using some craft wire from Walmart, but it proved to be too soft and flexible to hold the shape.
In order to cut down on the amount of time needed to complete this project I tweaked the pattern a bit. I used a hook size a bit larger (4mm rather than a 2mm) and a little heavier yarn (worsted weight rather than sport weight).
I eliminated rounds 9 and 20 on the head and round 50 to 60 on the skirt. This made the work go faster without changing the size of the granny too much.
For the apron, which is made from the bottom up I eliminated 5 rows from rows 2-29. I also decreased the large pocket by 5 rows and adjusted the smaller pockets to fit as well.
And that's how I make my grannies! Hope my little tips and tricks help you as you make them too!
A few people have mentioned that this doll would make a great lamp base. I agree and will add that to my list of projects, but that will be the subject of a future blog episode, so be sure to click here to follow this blog. You won't want to miss anything!
Blessings!
Reny
Sunday, September 30, 2018
Tuesday, September 25, 2018
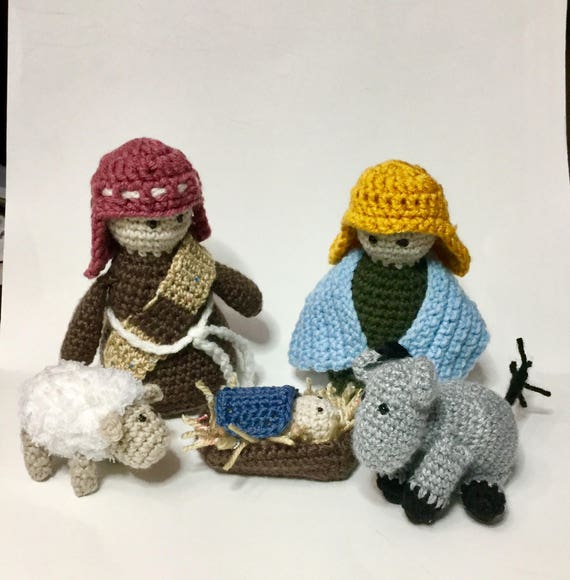
Christmas Nativity Play Set Crochet Pattern part 2 Baby Jesus and Manger
Part 2
Baby Jesus and Manger
(See part 1 for the pattern for Mary and Joseph)
Manger worked in rows.
1, Ch 13, sc in 2nd ch from hook and each ch. (12) Ch1, turn
2. Sc in each stitch.
3 Repeat for a total of 24 rows.
Fold down 5 rows on each end and sew along edges.
Head and foot of manger
Ch 7, sc in 2nd ch from hook and each ch. (6) Ch1 and turn.
2-5 Repeat
6. Sc around 3 sides. Fasten off leaving long tail to stitch head and foot to ends of manger.
Bed of straw
Ch 7, sc in 2nd ch and next 5 ch. 3 sc in next, sc in 5 chs on opposite side of ch, 3 sc in last. Fasten off For straw, cut abotu 50 strands oyellow yarn approximately 3 inches long. Fasten loops of yellow yarn to each stitch around. Trim if desired. Place straw in manger.
Baby Jesus
Make 6 sc in magic ring
Inc. each st. (12)
*Sc 2, inc.* (18)
4-6 Sc in each stitch
7. *Sc 2, dec.* (12)
8. *Sc 2, dec* (9)
9. *Sc 2m inc.* (12)
10-13. Sc in each stitch.
14. *Sc 2, dec.* (9)
15. Stuff. Dec till closed. Fasten off and weave in ends.
Crochet a little blanket or make one of fabric to swaddle the baby in.
Blessings!
Reny
Sunday, September 23, 2018
Here Fishy Fishy! Crochet Fish Pattern for a Christmas Ornament!
I'm still working on Christmas ornaments, and I'm getting quite a collection! My latest addition is this pair of crochet angle fish.
The larger fish is made from acrylic yarn and a G hook. The smaller one is Cleo cotton and crocheted with a E hook.
I found this pattern at Little Giggles Adventures blog. The instructions were easy to follow and I was able to finish a fish in a short time, so hop on over to Little Giggles and look over her selection of free patterns!
I believe they will be very cute on our Whimsy tree!
Make your tree special this year with handmade ornaments, then give them away as toys or family keepsakes!
Happy Hooking!
Reny
Monday, September 17, 2018
Free Crochet Nativity Play Set Pattern Part 1
This post may contain affiliate links.*
Christmas is coming!!!
My grandchildren have always loved playing with the nativity that is traditionally displayed at our house over the holidays, so I decided to design a soft, durable one for them.
This pattern has several different pieces to it, so I will post it bit by bit over the next few weeks in the interest of space saving. The entire pattern which includes several photos can be purchased in my Etsy shop if you want it all at once.
Crochet Nativity Playset
This crochet Nativity set includes Mary, Joseph, Baby Jesus, a donkey and a sheep. Also included are the shawls, head pieces and manger. While there are many parts to this pattern, the stitches are simple and the instructions are fairly easy to understand. Both Mary and Joseph have round circles of plastic canvas in the bottom to give them a flatter surface to help them stand.
Materials Needed:
Worsted weight yarn
Fluffy yarn (I use Bernat Pipsqueak)
G crochet hook
yarn needle
safety eyes or puff paint
Abbreviations:
sc- single crochet
hdc- half double crochet
dc- double crochet
inc- make 2 stitches in 1 stitch
dec- crochet 2 stitches together
blo- make next stitch in back loop only
sl st- slip stitch
ch- chain
Mary and Joseph
Both of these basic characters are made the same, but have different colors and accessories. The bodies are crocheted in the color you choose for the clothes with a change in color for the head. Arms are made to match the body.
Make 6 sc in a magic ring.
Make 2 sc in each stitch. (12)
*Sc 1, inc*. (18)
*Sc 2, inc* (24)
*Sc 3, inc* (30)
*Sc 4, inc* (36)
*Sc 5, inc* (42)
Sc in BLO of each stitch
9-11 Sc in each stitch
12. *Sc in 5, dec* (36)
13. Sc in each stitch
14. *Sc in 4, dec* (30)
15. Sc in each stitch
16. *Sc in 3, dec* (24)
17-22. Sc in each stitch.
23. *Sc in 2, dec* (18) Place 3 inch diameter circles of plastic canvas into bottom of figure to keep bottom flat. (I used 2 circles in each one.)
24. *Sc in 1, dec* (12)
25. Change to flesh colored yarn. Sc in each stitch. (12)
26. Make inc in each stitch. (24)
27. *Sc 3, inc* (30)
28. Sc in each stitch
29. *Sc 3, dec* (24
30-32 Sc in each stitch
33. *Sc in 2, dec* (18)
34. *Sc in 1, dec* (12) Stuff firmly.
35, Dec. till closed. Fasten off and weave in ends.
For the eyes, either place safety eyes before stuffing and closing or place dots of puff paint.
Joseph’s Headcover
In a magic ring make a chain 3 and 12 dc. Join with a sl st.
Ch. 3, dc in same stitch as chain, *dc, inc, dc* dc in same stitch as chain, sl st in top of ch 3. (20 dc +1 ch 3)
Ch 3, dc in each stitch. (20 dc +1 ch3)
Work in rows now. Ch 3, dc in same st as ch 3, dc in 9, inc in next st. Turn.
Ch 3, dc in same st., dc in 10, inc in next st. Turn.
Ch 3, dc in same st., dc in 12, inc in next st.
Continue around head piece to make edge. sc up side of cover, sc in each dc across front (10 sc), sc 6 down other side., sc 15 across bottom. Fasten off and weave in ends.
For Mary’s head cover, repeat as for Joseph but add 1 additional row of sc.
For Joseph’s headband, ch 40, fasten off. Weave through head covering stitches as shown in pic.
Arms Make 2 for each figure
Using yarn to match clothes,
Make 6 sc in a magic ring.
Inc. each st. (12)
3-5. Sc in each st. (12)
6. *Sc 2, dec.* (9)
7-10. Sc in ea st. (9) Stuff lightly.
11 Sc open edge of arm together with 4 sc. Fasten off leaving a long tail to sew arm to body.
Joseph’s scarf
Ch 6, sc in 2nd. ch from hook and next 4 chains. (5) Ch 1, turn.
Sc in each st., ch1, turn.
Repeat row 2 until you have the length you want, making color changes as desired for stripes. Fasten off and weave in ends.
Joseph’s belt
Make a chain as long as you want the belt to be and tie it around his waist.
Mary’s shawl
Ch 31, sc in 2nd ch from hook and each ch. (30) Ch 1, turn.
Sc in each stitch, ch 1, turn.
Repeat for a total of 9 rows. Fasten off and weave in ends.
Check back next week for the Baby Jesus and manger pattern. See you then!
Blessings!
Reny
*We are a participant in the Amazon Services LLC Associates Program, an affiliate advertising program designed to provide a means for us to earn fees by linking to Amazon.com and affiliated sites.
Thursday, September 13, 2018
Baby Unicorn Crochet Pattern, Free
This baby unicorn is going to be adorable on my Whimsy Tree this Christmas. He took some work and some redoing before I got him the way I wanted. He needed to be small enough for an ornament and had to have lots of color. I decided to give him round feet just for something a little different. His mane and tail were the biggest challenge. I tried about 4 different ideas before I settled on separating the yarn plies to make a fluffy mane and tail. His finished size is about 4 1/2 inches long and 3 1/2 inches tall.
I hope you will enjoy making this little fella.
Blessings!
Reny
Baby Unicorn Pattern
Materials:
Worsted weight yarn in white and small amts colors
Small amt. sport yarn for horn
Crochet hook 3.5mm (E hook)
6mm safety eyes
Polyfill stuffing
Yarn needle
Crochet terms:
st- stitch
sc- single crochet
mc- magic circle
rnd- round
hdc- half double crochet
inc- increase (2 stitches in in stitch)
dec- decrease (sc 2 stitches together)
**- repeat instructions to end of rnd or number of times specified.
Head: With white worsted weight yarn
Make 6 sc in a mc.
Inc. x’s 6 (12)
Sc in each st. (12)
Sc in 4 st., inc x’s 4, sc in last 4 st. (16)
5-7. Sc in ea. st. (16)
On inside of head, place a stitch at eye placement position on both sides of head and tug and fasten off to create a small indention for eyes. Place eyes between rnds 4 and
8. Dec x’s 8. (8)
9. Dec til closed.Fasten off leaving long tail to sew head to body.
Body: With worsted weight yarn
Make 6 sc in a mc.
Inc x’s 6, (12)
3. *Sc in 1, inc* (18)
4-7 Sc in each st. (18)
8. *Sc in 2, dec* Sc in last 2 stitches. (14)
9. Sc in ea. st. (14)
10. *Sc in 2, inc* Sc in last 2 sts. (18)
11. Sc in ea. st. (18) Stuff now.
12. *Sc in 1, dec* (12)
13. Sc in ea. st. (12)
14 Dec x’s 6. (6)
15. Dec till closed. Fasten off and weave in ends.
Horn: With sport weight yarn,
Make 3 sc in a mc.
Sc in 2, inc. (4)
3-5. Sc in ea.
Finish off leaving long tail to sew to top of head.
Feet: Make 4 With worsted weight yarn in bright colors.
Make 5 hdc in a mc.
Inc x’s 5 (10)
Hdc in ea. (10)
Dec hdc x’s 5 Stuff foot firmly.
Dec till closed. Fasten off leaving tail to sew to body.
Ears: Make 2 with worsted weight yarn.
Chain 4. Slip st. in 2nd. ch from hook. Sc in next 2 chains. Fasten off leaving tail to sew to top of head.
To make the mane and tail cut lengths of yarn about 5 inches long, several strands of colors of choice. Separate plies of ea. strand to make 4 strands of each. This is what gives the mane and tail it’s fluffy look. Loop 4 seperated strands together into a stitch on the back of the head, repeating from top of head to back of unicorn. Trim mane if desired.
Do the same separating for the tail, but loop all tail strands together through one stitch at the backside of the unicorn. Trim if desired.
Your baby unicorn is finished!
Saturday, September 8, 2018
Funny Little Crochet Key Rings, Backpack Charms, Stocking Stuffers. Party Favors.....
Need some smallish items for Christmas gifts this year?
These fellas are great for a number of different uses. Stocking stuffers, key rings, backpack charms, party favors, you name it. Make a basket full for a craft show or bazaar! Wherever you need a small, quick, cute project, these funny little monsters will fill the bill!
The free pattern is included below. I would love to see some of your projects using this pattern.
Mini Monster Key Chains
If you’re looking for a small gift, a handmade party favor, a stocking stuffer, backpack charm,etc. this might be just the thing!
These little monsters are quick and easy to make. The varieties of color combinations and facial expressions are endless.
Materials:
Small amounts of yarn. I like Cleo Cotton, but any yarn will work.
Size B hook or the size recommended for your yarn
8 - 10mm beads. Wooden or plastic with holes big enough to thread onto crochet chains
6mm safety eyes
Small bit of felt (optional)
Yarn needle or embroidery needle
Small amount of polyfil stuffing
Metal keyring (optional)
Crochet Terms:
** Instructions between asterisks, repeat to end of rnd or times stated
MC- magic circle
SC-single crochet
INC- increase (2 sc in 1 stitch)
DEC-decrease (1 sc over 2 stitches)
CH- chain
Body: Make 1
1. Make 6 sc in a mc.
2. Inc X’s 6 (12)
3. *Sc in 1, inc* (18)
4. *Sc in 2, inc* (24)
Rnds 5-10. Sc in each st. (24)
Place eyes between rnds 9 and 10. Cut a small piece of felt to place behind eye if desired by cutting a small oval, make a small hole for post of eye and push eye through felt and stitches of body. Secure inside the body.
11. *Sc in 2, dec.* (18)
12. *Sc in 1, dec* (12)
13. Dec X’s 6.
14. Dec. till closed. Do not fasten off.
Chain 7 at the top of the body. Turn work and sc in each chain creating a tab. Fasten off leaving a tail for sewing. Place key ring into tab and fold tab over ring
sewing the end of tab to secure ring.
Arms and Legs: Make 1 of each
Arms are made in one piece and legs are made in one piece.
Chain 40 and fasten off leaving a short tail on each end.
Tie a knot in one end. Thread a bead onto the chain pulling it down to the knot.
Sticking your crochet hook through the body of the monster, hook the chain and pull the un-knotted end through the middle of the body and through to the other side.
Thread on another bead. Make a knot on this end. Trim off any excess chain.
Do the same for the legs, positioning them at the lower part of the body.
Embroider on a cute mouth and you are finished! Now isn’t he just the cutest!?
Don’t be surprised if everyone you know wants one!
Blessings!
Reny
Wednesday, September 5, 2018
Not a Whale of a Tail, but a Manatee Moment, Christmas Ornament Crochet-a-long Week 11
Who doesn't love a manatee? While looking for a manatee pattern for my Whimsy Tree, I came across this very cute pattern! Simple and free, two very good reasons to give it a try!
I love the way this designer used a special 'front post single crochet' to help define the shape of this project. Her pattern is detailed and easy to follow. Her finished manatee is about 10 inches long. But I was looking for a much smaller one to serve as a tree ornament. My efforts to scale it down with the materials I had on hand (I was out of town visiting family at the time) were only partly successful. My manatee ended up being 9 inches long. Still adorable, but much too large for what I wanted.
http://hookedbykati.com/2018/08/01/free-manatee-crochet-pattern/
Well, once a project is finished I like to keep it around for awhile until I decide what I will do with it. And, as I often do, I sent a pic of this one to my sister because she loves manatees!
This is the same sister who has an eye for details and lots of worthy suggestions. And I do tend to take her suggestions to account. So a few embellishments were added to this gal.
A pretty flower over her fin and a bit of green salad in her mouth and she took on a bit of personality.
In the meantime, I was musing over how to recreate a smaller version of her when I ran across this link on Pinterest for a mini-manatee!
https://www.ravelry.com/patterns/library/mini-manatee-3
In less than an hour's time, baby manatee was finished! The
trouble with manatees is that they are not very striking animals
in appearance. Although they are huge and graceful, they are
otherwise rather dull looking. Once again, my detail oriented
sister came to the rescue.
"He would really be cute if he had a pacifier!"
That's it! A binkey for the baby!
So there we have it! Momma Manatee and baby. Baby can float on the tree while momma watches from below.
Many thanks to the designers of these two patterns! I really enjoyed making them!
Blessings!
Reny
The manatee, or Sea Cow, is a sweet, gentle animal, roly-poly in shape with a flat tail. (Hmmm… that sounds like me, (except for the tail – mine is more plump than flat.) They are mammals, and so do not have gills and cannot breathe underwater. (Me neither!!!) They spend their lives in shallow waters, coming to the surface for a breath every 4-6 minutes, but can go as long as 15 minutes. When they do take a breath, they refresh 90% of the air in their lungs, which is waaaay more than we humans do when we inhale!
The Big Three activities for a manatee are eating, sleeping and looking for their next meal. They actually spend half of their day sleeping. (I could do that!) The other half of the day is spent looking for food and eating. (Uh-huh, I can relate!) They are vegetarians, and weeds, algae, mangrove leaves, and sea grass are always on the menu. And they eat a LOT of it!
Looking at a manatee, you might think it has a nice thick insulating layer of fat on its body (just like me!), but they really are not well insulated in that way at all; most of their huge abdomen is taken up with stomach and intestines. It’s kind of understandable that they need that much digestive equipment when you consider that we humans would have to eat 15 POUNDS of food in one day to match what the manatees eats!
Baby manatees are born under water, of course, and mama helps them get to the surface for their first breath. Then the hungry baby looks for breakfast and finds it in Mama’s ARMPIT! Yes, the nipple is placed behind Mama’s flipper – a nice little protected place for baby to feed while Mama cruises to her next ‘salad’.
And imagine this: they’re related to the elephant! Like the elephant, manatees have 3-4 ‘fingernails’, a similar circular-shaped heart, and can grow ‘replacements’ when their diet wears down their teeth. In fact, the manatee has an unlimited supply of replacement teeth! (Wish I had that!)
Manatees have no natural enemies, except maybe boat motor propellers, which is one of the leading causes of death for them. Recognized as a Vulnerable Species – declining in number – they are protected by many laws, including speed limits for boats in area where manatees are found. In fact, even TOUCHING a manatee can get you arrested in Florida and can result in hefty fines and jail time!
If you ever get a chance to visit an area with manatees, be sure to try to see them. There are many places in Florida where manatees are visible, and even places where you can get in the water with them, under close supervision of course! And they even have their own special holiday: the last Wednesday in March is Manatee Appreciation Day! Whether you see them live or just enjoy them in pictures and crafts, these gentle sea creatures will win your heart!
I love the way this designer used a special 'front post single crochet' to help define the shape of this project. Her pattern is detailed and easy to follow. Her finished manatee is about 10 inches long. But I was looking for a much smaller one to serve as a tree ornament. My efforts to scale it down with the materials I had on hand (I was out of town visiting family at the time) were only partly successful. My manatee ended up being 9 inches long. Still adorable, but much too large for what I wanted.
http://hookedbykati.com/2018/08/01/free-manatee-crochet-pattern/
Well, once a project is finished I like to keep it around for awhile until I decide what I will do with it. And, as I often do, I sent a pic of this one to my sister because she loves manatees!
This is the same sister who has an eye for details and lots of worthy suggestions. And I do tend to take her suggestions to account. So a few embellishments were added to this gal.
A pretty flower over her fin and a bit of green salad in her mouth and she took on a bit of personality.
In the meantime, I was musing over how to recreate a smaller version of her when I ran across this link on Pinterest for a mini-manatee!
https://www.ravelry.com/patterns/library/mini-manatee-3
In less than an hour's time, baby manatee was finished! The
trouble with manatees is that they are not very striking animals
in appearance. Although they are huge and graceful, they are
otherwise rather dull looking. Once again, my detail oriented
sister came to the rescue.
"He would really be cute if he had a pacifier!"
That's it! A binkey for the baby!
So there we have it! Momma Manatee and baby. Baby can float on the tree while momma watches from below.
Many thanks to the designers of these two patterns! I really enjoyed making them!
Blessings!
Reny
This is written by Kathy Bates who loves manatees and has spent considerable time learning about these awesome mammals. Kathy is my sister and a constant source of amazing info and facts that I would never have thought of myself. Her sense of humor and wit keep us both laughing all the time!
Am I Part Manatee?
The Big Three activities for a manatee are eating, sleeping and looking for their next meal. They actually spend half of their day sleeping. (I could do that!) The other half of the day is spent looking for food and eating. (Uh-huh, I can relate!) They are vegetarians, and weeds, algae, mangrove leaves, and sea grass are always on the menu. And they eat a LOT of it!
Looking at a manatee, you might think it has a nice thick insulating layer of fat on its body (just like me!), but they really are not well insulated in that way at all; most of their huge abdomen is taken up with stomach and intestines. It’s kind of understandable that they need that much digestive equipment when you consider that we humans would have to eat 15 POUNDS of food in one day to match what the manatees eats!
Baby manatees are born under water, of course, and mama helps them get to the surface for their first breath. Then the hungry baby looks for breakfast and finds it in Mama’s ARMPIT! Yes, the nipple is placed behind Mama’s flipper – a nice little protected place for baby to feed while Mama cruises to her next ‘salad’.
Manatees have no natural enemies, except maybe boat motor propellers, which is one of the leading causes of death for them. Recognized as a Vulnerable Species – declining in number – they are protected by many laws, including speed limits for boats in area where manatees are found. In fact, even TOUCHING a manatee can get you arrested in Florida and can result in hefty fines and jail time!
If you ever get a chance to visit an area with manatees, be sure to try to see them. There are many places in Florida where manatees are visible, and even places where you can get in the water with them, under close supervision of course! And they even have their own special holiday: the last Wednesday in March is Manatee Appreciation Day! Whether you see them live or just enjoy them in pictures and crafts, these gentle sea creatures will win your heart!
Subscribe to:
Posts (Atom)