Showing posts with label free pattern. Show all posts

Friday, October 26, 2018

The Criss Cross Crochet Beanie. You wanna make this one!


This post may contain affiliate links.*


A couple of weeks ago I was surfing through my crochet Facebook groups and ran across a post from Loops & Love  asking for pattern testers.  I've always wanted to be a pattern tester, but up to now just didn't really know how to go  about becoming one.  So, of course, I applied.

This began a surge of beanie making that hasn't stopped yet!

I absolutely love this pattern!  The different stitches give it great texture.  It appears a bit complicated, but is really so easy.  The stitches are simple, but the way they are combined is just brilliant!  And  the color combinations are endless.  You can find this awesome free pattern at  Loops & Love.
.

The first beanie I made was with Universal Yarn,  Classic Shades Frenzy.  The color is HARBOR LIGHTS.    After the fact I decided to add a pompom just for fun and because this beanie is a Christmas gift for a 4 year old.  (This PomPom Maker is awesome and very reasonably priced!)


The second one was crocheted from Red Heart Stripes.   (The same yarn Loops & Love used for her beanies.)   One skein was enough for about one and a half beanies.  So for the third beanie I used the remainder of the Stripes yarn and then searched through my stash to see if I had any yarn that would keep the continuity of the colors to finish off the beanie.  I think I came pretty close!


So now I'm on a roll!  My Pokemon kids, decided they all need Pokeball beanies, sooooo......I used this same beanie pattern with a few minor changes. These are crocheted from Red Heart worsted weight acrylic yarn.   The ribbing is the same as the original Criss Cross Beanie Pattern, but as I started the body of the hat I used a simple half-double stitch throughout the remainder of the beanie.  As I  neared the place where decreases needed to be made, I decreased in one row and crocheted in each stitch in the next row until I reached the top, where I finished off the beanie with a yarn strand woven through the final row of stitches and pulled tight.   I then secured the end of this strand inside the top of the hat and wove in the ends.   This pulls the top together nicely.   The 'button' is simply a circle with a row of black around the edge to finish it off.


As you can see, this pattern is extremely versatile.  Instructions for different sizes are included.  Oh, and did I mention that this beanie works up quickly?  You could easily make one in a few hours time, even if you work slow like I do.


So hop on over to Loops & Love. and make everyone on your Christmas list one of these great beanies!  You'll be glad you did, and so will they!

Blessings!
Reny 


*We are a participant in the Amazon Services LLC Associates Program, an affiliate advertising program designed to provide a means for us to earn a small fee if
you purchase by clicking on a product link.  Hey, it helps pay the bills!

Friday, October 12, 2018

Crochet Puppy Ornament/toy, Quirky, Unique Handmade Amigurumi


I love searching out new and unique projects to work on!  I found one similar to this on Pinterest and searched in vain for a pattern.  Not finding one, I did the next best thing.  I developed my own.  It's not exactly like the one on Pinterest , but close enough to satisfy me.


I have made this puppy in a larger size, but wondered if I could downsize the pattern to make it more the size for a Christmas ornament.  While it turned out larger than I really wanted, I think it will work just fine.  

Below is the pattern for the puppy.  It is a little involved with the construction of it, but if you follow along closely, you should be able to make it.

For a downloadable pattern with photos plus the pattern for the cat, visit my Etsy shop.


The pattern in my Etsy shop also includes instructions to make the cat in this pic.  I thought they looked like best friends!


Puppy Pattern


This finished puppy is approximately 6 inches long from head to tail.  The size can be increased or decreased by changing the weight of the yarn and the hook size.  A heavier yarn (ex. worsted weight) and a larger hook will give you a larger puppy.  A thinner yarn and a smaller hook will give you a smaller puppy.


Materials:
DK or Sport weight Yarn  (I used Cleo Cotton)
2.75mm or C hook
Safety eyes
Polyfil stuffing
Yarn needle
8 buttons with large holes
12.5mm wooden or plastic beads  (12 of them)  Optional.


Crochet Terms:
CH- chain
ST-  stitch
MC-  magic circle
SC-  single crochet
INC-  increase (2 stitches in one stitch of previous round)
DEC- decrease  (one stitch made over 2 stitches of previous round)
F/O-  fasten off
Repeat instructions between asterisks ** to end of round.

Tips:
Worked in rounds.  I used a running stitch marker to keep track of rounds.  The easiest way to make this puppy is to complete all individual components and then assemble.  My method of attaching the legs requires securing them to the inside of the body before stuffing and closing it, but you could just stitch the leg balls together and then sew them to the body if you like.   If you use my method, be mindful of where you position the legs, as they cannot easily be moved after the body is stuffed and closed. The safety eyes are placed before the head is stuffed and closed.  If you prefer, you can embroider or use felt for the eyes.  Embroider on a mouth and eyebrows if you like.

Head:
 In a mc make 6 sc.
Inc. in each st. (12)
3.  *Sc 1, inc*  (18)
4.  *Sc 2, inc*  (24)
5-17.  Sc in each st.  (24)  Make color change at about round 8.  Place safety eyes at about round 12.
18.  *Sc 2, dec*  (18)
19.  *Sc 1, dec* (12)
20.  Dec x’s 6  (6)
21.  Dec till closed.  F/O

Neck:
 Mc with 6 sc.
Inc. in each st.   (12)
3.  *Sc 1, inc*  (18)
4-6  Sc in each st.  F/O
Stuff neck and stitch open end to bottom of head.

Ears:  Make 2
 Mc with 5 sc.
Inc in each stitch.  (10)
*Sc 1, inc*  (15)
*Sc 2, inc*  (20)
5-7  Sc in each stitch  (20)
8.  *Sc in 8, dec*  (18)
9.  *Sc in 7, dec*  (16)
10.  *Sc in 6, dec*  (14)
11.  *Sc in 5, dec*  (12)
12-14.  Sc in each stitch.
15.  Dec x’s 6.  F/O.
Stitch ears to head in desired position.

Nose:
 Mc with 6 sc.
Inc  in each stitch  (12) Stuff llightly
Dec  till closed.
Stitch to end of snout.

Body:
 Mc with 6 sc.
Inc in each stitch  (12)
*Sc 1, inc*  (18)
*Sc 2, inc* (24)
*Sc 3, inc*  (30)
6-25.  Sc in each stitch.
26.  *Sc 3, dec*  (24)  Attach legs at this point before stuffing.  (See assembly instructions)
27.  *Sc 2, dec* (18)  Stuff body.
28.  *Sc1, dec*  (12)
29.  Dec x’s 6  (6)
30.  Dec till closed.  F/O


Feet top:  Make 4
 Mc with 6 sc
Inc in each stitch  (12)
*Sc 1, inc*  (18)
*Sc 2, inc*  (24)
5-8.  Sc in each stitch.  F/O

Feet bottom:  Make 4
 Mc with 6 sc
Inc in each stitch  (12)
*Sc1, inc*  (18)
*Sc 2, inc*  (24)  F/O

Balls for legs, tail and head bows.  Make 19
 Mc with 6 sc
Inc. in each stitch  (12) 
3-4  Sc in each stitch  (12)
Place a bead inside your work at this point. (Or you may choose to simply stuff the balls rather than use beads.)
5.  Dec x’s 6  (6)
6.  Dec till closed.  F/O

Tail:  Make 3
1.  Chain 15 or however long you want your tail to be.  
2.  Attach a ball to the end of each chain.
3.  Tie the ends of the chains together and attach to the backside of the puppy.

Head bow:  (optional)
 Make 2 chains about 40 stitches long.
Attach a ball to each end of each chain.
Tie into a bow and attach to head.

To assemble and attach legs and feet,  thread your yarn needle with some strong cord.  Thread through one of the holes on a button leaving a length of about 3 or 4 inches for tying off.  Thread through a foot top from the inside with the button resting against the inside top of the foot.  Next thread through 3 balls with the cord going through the center hole of the beads.  Thread through the body at your preferred position for the leg and through the hole of a second button inside the body.  Now, thread through the second hole of the button going back through the body and through each ball, down throuh the top of the foot and through the second hole of the button inside the foot.  You should now have 2 cord ends.  Pull the cord tight and tie into a tight knot to secure the leg to the body.    Repeat with remaing legs.  Now you can stuff the body and close it up.  Also stuff the feet and sc the bottoms on to the feet with all yarn and cord ends tucked inside.

Attach head and neck to front of body.   Add the tail and the bow.  Your puppy is completed. 


Saturday, October 6, 2018

Christmas Nativity Play Set Part 4

This post may contain affiliate links.*

Sheep
This is the last section of this play set.   I hope you have enjoyed making it and that your littles will enjoy playing with it while they learn the Christmas story.

image 0

Sheep
With brown yarn, make 6 sc in a magic ring.
Inc.  (12)
3-6.  Sc in each stitch.  (12)
7.  To form ears,  sc in 4, ch 4, sc in 2nd ch from hook, hdc in 3rd and 4th chains, sc in ch. space, sc in 4 sc, ch. 4, sc in 2nd ch from hook, hdc in 3rd and 4th ch. sc in ch space, sc in remaining sc in rnd.
8.With fluffy white yarn,(I use Bernat Pipsqueak)  sc in each stitch folding ears forward and working around back of them as you go.  (12)
9.  Make 18 sc this round.  It is hard to see individual stitches with this yarn so just try to place them evenly around.
10-13.  Repeat round 9.
14.  Start dec when you feel your sheep is about the size you want him.  Fasten off and weave in yarn.

Legs.  Make 4
 With brown yarn, Make 5 sc in a magic ring.
2-5.  Sc in each stitch.
Fasten off, stuff and attach to underside of sheep.


If you feel really ambitious, you could make a flock of sheep and using the Joseph pattern make some shepherds.  I think that would be a cute addition to this play set.

Blessings!
Reny

*We are a participant in the Amazon Services LLC Associates Program, an affiliate advertising program designed to provide a means for us to earn fees by linking to Amazon.com and affiliated sites.

Monday, October 1, 2018

Christmas Nativity Play Set Pattern Part 3

Christmas Nativity Play set Pattern Part 3


image 0


Donkey
Head
 Make 6 sc in a magic ring.
Inc. in each st.  (12)
*Sc 1, inc*  (18)
4-9  Sc in each stitch.
10.  *Sc in 2, inc.*  (24)
11.  *Sc in 2, dec.*  (18)
12.  Sc in each stitch.
13. *Sc 1, dec* (12)
14. *Dec*  (6)  Stuff head.
15. Dec. till closed.  Fasten off leaving tail to sew to body.

Ears  Make 2.
 Make 6 sc i a magic ring.
Inc.  (12)
Sc in each stitch.  Fasten off, leaving tail to sew to head.
Pinchone end together and sew ears to head.

For hair, loop several strands of black yarn onto top of head.

Body
 Make 6 sc in a magic ring.
Inc.  (12)
*Sc 1, inc* (18)
*Sc 2, inc* (24)
*Sc 3, inc* (30)
6-10.  Sc in each stitch.  (30)
11.  *Sc 3, dec.*  (24)
12. Sc in each stitch.
13.  *Sc 2, dec*  (18)
14-16  Sc in each stitch.
17. *Sc 1, dec*  (12)
18. Sc in each stitch.  Stuff body.
19.  Dec till closed.  Attach head to body.

Donkey legs.  Make 4
 With black yarn,  Make 5 sc in a magic ring.
Inc.  (10)   Change to main donkey color.
3-8.  Sc in each stitch.   Stuff  Fasten off leaving tail to seew to body.
Attach legs as desired or as pictured.


Tail.
Chain 7, slip stitch in 2nd chain from hook and each chain.    Attach loops of yarn to end of tail and sew tail to backside of donkey.

If you are enjoying my blog and would like to be sure not to miss anything please click this follow link and sign up!

Blessings!
Reny

Tuesday, September 25, 2018

Christmas Nativity Play Set Crochet Pattern part 2 Baby Jesus and Manger

image 0


Part 2 
Baby Jesus and Manger

(See part 1 for the pattern for Mary and Joseph)                                 


Manger  worked in rows.
1,  Ch 13, sc in 2nd ch from hook and each ch.  (12)  Ch1, turn
2.  Sc in each stitch.
3  Repeat for a total of 24 rows.

Fold down 5 rows on each end and sew along edges.


Head and foot of manger
 Ch 7, sc in 2nd ch from hook and each ch.  (6)  Ch1 and turn.
2-5  Repeat
6.  Sc around 3 sides. Fasten off leaving long tail to stitch head and foot to ends of manger. 

Bed of straw
Ch 7, sc in 2nd ch and next 5 ch.  3 sc in next, sc in 5 chs on opposite side of ch, 3 sc in last.  Fasten off For straw,  cut abotu 50 strands oyellow yarn approximately 3 inches long.  Fasten loops of yellow yarn to each stitch around.  Trim if desired.  Place straw in manger.


Baby Jesus
 Make 6 sc in magic ring
Inc. each st.  (12)
*Sc 2, inc.*  (18)
4-6  Sc in each stitch
7.  *Sc 2, dec.*  (12)
8.  *Sc 2, dec*  (9)
9.  *Sc 2m inc.*  (12)
10-13.  Sc in each stitch.
14.  *Sc 2, dec.* (9)
15.  Stuff.  Dec till closed.  Fasten off and weave in ends.
Crochet a little blanket or make one of fabric to swaddle the baby in.

Blessings!
Reny


Sunday, September 23, 2018

Here Fishy Fishy! Crochet Fish Pattern for a Christmas Ornament!

     I'm still working on Christmas ornaments, and I'm getting quite a collection!  My latest addition is this pair of crochet angle fish. 

      The larger fish is made from acrylic yarn and a G hook.  The smaller one is Cleo cotton and crocheted with a E hook.


     I found this pattern at Little Giggles Adventures  blog.  The instructions were easy to follow and I was able to finish a fish in a short time, so hop on over to Little Giggles and look over her selection of free patterns!


     I believe they will be very cute on our Whimsy tree!

Make your tree special this year with handmade ornaments, then give them away as  toys or family keepsakes!

Happy Hooking!
Reny

Monday, September 17, 2018

Free Crochet Nativity Play Set Pattern Part 1

This post may contain affiliate links.*


Christmas is coming!!!

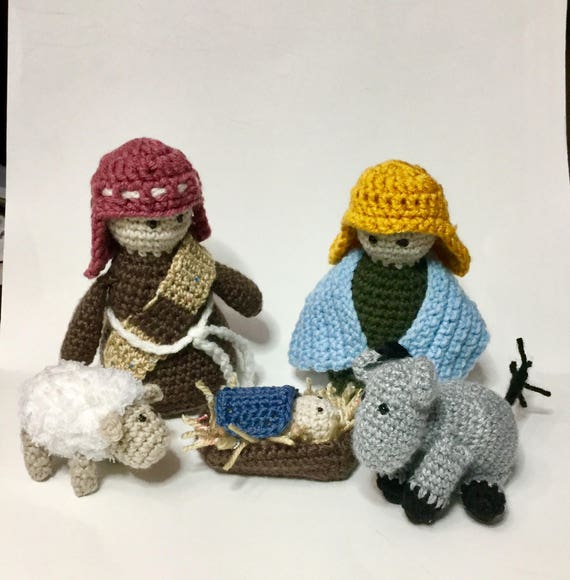
My grandchildren have always loved playing with the nativity that is traditionally displayed at our house over the holidays, so I decided to design a soft, durable one for them.  

This pattern has several different pieces to it, so I will post it bit by bit over the next few weeks in the interest of space saving.  The entire pattern which includes several photos can be purchased in my Etsy shop if you want it all at once.


image 0
Crochet Nativity Playset

This crochet Nativity set includes Mary, Joseph, Baby Jesus, a donkey and a sheep.  Also included are the shawls, head pieces and manger.  While there are many parts to this pattern, the stitches are simple and the instructions are fairly easy to understand.  Both Mary and Joseph have round circles of plastic canvas in the bottom to give them a flatter surface to help them stand. 


Materials Needed:
Worsted weight yarn
Fluffy yarn  (I use Bernat Pipsqueak)
G crochet hook
yarn needle
safety eyes or puff paint

Abbreviations:
sc-  single crochet
hdc-  half double crochet
dc-  double crochet
inc- make 2 stitches in 1 stitch
dec- crochet 2 stitches together
blo- make next stitch in back loop only
sl st- slip stitch
ch- chain


Mary and Joseph  


Both of these basic characters are made the same, but have different colors and accessories.  The bodies are crocheted in the color you choose for the clothes with a change in color for the head.  Arms are made to match the body.

 Make 6 sc in a magic ring.
Make 2 sc in each stitch.  (12)
*Sc 1, inc*.  (18)
*Sc 2, inc*  (24)
*Sc 3, inc* (30)
*Sc 4, inc* (36)
*Sc 5, inc* (42)
Sc in BLO of each stitch
9-11 Sc in each stitch
12.  *Sc in 5, dec*  (36)
13.  Sc in each stitch
14.  *Sc in 4, dec*  (30)
15.  Sc in each stitch
16.  *Sc in 3, dec*  (24)
17-22.  Sc in each stitch.
23.  *Sc in 2, dec*  (18)  Place 3 inch diameter circles of plastic canvas into bottom of figure to keep bottom flat. (I used 2 circles in each one.) 
24.  *Sc in 1, dec*  (12)
25.  Change to flesh colored yarn.  Sc in each stitch. (12)
26.  Make inc in each stitch.  (24)
27.  *Sc 3, inc*  (30)
28.  Sc in each stitch
29.  *Sc 3, dec* (24
30-32  Sc in each stitch
33. *Sc in 2, dec*  (18)
34. *Sc in 1, dec*  (12)  Stuff firmly.
35,  Dec. till closed.  Fasten off and weave in ends.

For the eyes, either place safety eyes before stuffing and closing or place dots of puff paint.


Joseph’s Headcover

 In a magic ring make a chain 3 and 12 dc.  Join with a sl st.
Ch. 3, dc in same stitch as chain,  *dc, inc, dc*  dc in same stitch as chain,   sl st in top of ch 3.  (20 dc +1 ch 3)
Ch 3, dc in each stitch.  (20 dc +1 ch3)
Work in rows now.  Ch 3, dc in same st as ch 3, dc in 9, inc in next st.  Turn.
Ch 3, dc in same st., dc in 10, inc in next st.  Turn.
Ch 3, dc in same st., dc in 12, inc in next st.
Continue around head piece to make edge.  sc up side of cover, sc in each dc across front  (10 sc), sc 6 down other side., sc 15 across bottom.  Fasten off and weave in ends.

For Mary’s head cover, repeat as for Joseph but add 1 additional row of sc.

For Joseph’s headband, ch 40, fasten off.  Weave through head covering stitches as shown in pic.

Arms  Make 2 for each figure

Using yarn to match clothes, 
 Make 6 sc in a magic ring.
Inc. each st.  (12)
3-5.  Sc in each st. (12)
6.  *Sc 2, dec.*  (9)
7-10.  Sc in ea st.  (9)  Stuff lightly.
11  Sc open edge of arm together with 4 sc.  Fasten off leaving a long tail to sew arm to body.

Joseph’s scarf
 Ch 6, sc in 2nd. ch from hook and next 4 chains.  (5)  Ch 1, turn.
Sc in each st., ch1, turn.
Repeat row 2 until you have the length you want, making color changes as desired for stripes.  Fasten off and weave in ends.

Joseph’s belt
Make a chain as long as you want the belt to be and tie it around his waist.

Mary’s shawl
 Ch 31, sc in 2nd ch from hook and each ch.  (30)  Ch 1, turn.
Sc in each stitch, ch 1, turn.
Repeat for a total of 9 rows.  Fasten off and weave in ends.


Check back next week for the Baby Jesus and manger pattern.  See you then!

Blessings!
Reny

*We are a participant in the Amazon Services LLC Associates Program, an affiliate advertising program designed to provide a means for us to earn fees by linking to Amazon.com and affiliated sites.

Saturday, August 18, 2018

Silly Posable Snake Week 8, Christmas Ornament Crochet-a-long Free Pattern

What's more whimsical than a cute little snake wrapped around the limb of a tree?   Maybe a snake with big bulgy eyes and crazy hair!


  These posable snakes are a favorite around our house when the grandkids come to visit!    Here is the pattern for this guy.


                             Posable Crochet Snake

Materials:
Sport weight yarn
3.5mm E crochet hook
2 bendable foam hair curlers Masking tape
Stuffing
4 or 6 mm safety eyes

This snake is made with a short starting chain and worked in rounds of sc. He can be made as long or as short as you want.
To make this snake posable, tape the two curlers end to end with masking tape. This will also serve as most of the stuffing for your snake.
  1. Chain 7. Sc in 2nd. ch. from hook and next 4 chains. Make 3 sc inc. in next chain. Rotate your work and make a sc in each of next 4 chains followed by another 3 sc inc. in the last chain. Place a running stitch marker to keep track of the rows.
  2. Sc in 7sc. 3 sc in next st. Sc in 6sc. 3 sc in last st.
  3-8. Sc in each stitch.
   9. *Sc in 4, dec.* Repeat to end of rnd.
10. *Sc in 5, dec*  Repeat to end of rnd. sc in last 2 st.
11  Sc in each sc until you reach the length you want your snake to be. 


Stuff head of snake firmly and insert taped foam curlers into the body. Stuff tail of snake before making decrease rounds and closing.

When you have the length you want, begin to decrease sc in the remaining rounds until closed.

Eyes:
With white yarn make a magic circle with 6 sc. Pull circle together and make a 2nd row of 6 sc. Place safety eye in the center of each eye and stitch eyes to top of head. I was not able to secure the eyes with the washer because there was not enough room inside the eyeball, so I secured them with glue. An alternative could be to place 
the eyes as soon as the head is crocheted so the safety eyes could be pushed through to the inside of the head and the washers placed. This is what I will do with the next snake I make. 

Embroider on a mouth if you want and crochet a chain for the tongue and sew on.

The hair is simply strands of yarn looped through a stitch and pulled tight.


He’s a pretty simple little snake and could be embellished in a number of ways. Little horns, spikes or antenna would be cute.

I hope you enjoy this pattern. I did kind of make it in a hurry, so if you have any questions, feel free to contact me and I’ll do my best to answer them.

Blessings!
Reny 


Monday, August 6, 2018

Week 6, Cute Little Monsters Christmas Ornament Crochet-a-long

≠≠≠
 What better way to decorate a Whimsy Tree than with cute little monsters with silly grins and crazy hair. 

In case you missed the beginning of this Crochet-a-long, check out this post for more info.

https://renysplace.blogspot.com/2018/06/christmas-crochet-long-new-ornament.html

This was my very first crochet pattern design and it was so well received that I have decided to offer it again to my readers!
    I absolutely adore bright colors and funny expressions. At our house we call it the 'cuteness factor'.  It is what I strive to achieve in all my varmint creations.  At times this means making several tries before it meets the requirements.  But the satisfaction of finally getting it right is so worth it!

   These little monsters are about 3 inches tall and are just the right size for little hands to carry around.  And I wish I could describe to you the delight we see in every child who has received one of these.  Big smiles, audible giggles as they toss them up in the air or hug them close to their little chests.    The wonder is that such a simple little monster could elicit all that.


    So I invite you to  enjoy this free crochet pattern.  I suggest you make several for adorable Christmas gifts.  And keep some extra's around for little visitors.  I try to do this and it is such a great help to parents when their child has something special to play with during the visit.  And then I send it home with them!


    All you need to make this free crochet pattern are some bits of leftover yarn, stuffing and some felt for the eyes.  Be sure to stitch eyes, arms and legs securely if you plan to give one of these to a baby.


   Once you have completed one, it's hard not to make more.  And the more you make, the more delighted your littles will be!


                                 Giggle Monster Pattern

Materials:
Worsted weight yarn
G crochet hook
fiberfill for stuffing
felt for eyes (or may use safety eyes if you like)
needle and thread to sew on eyes
yarn needle for weaving in ends

   This pattern is worked in rounds and I used a running stitch marker to keep track.  An understanding of basic stitches and general crochet terms is helpful.

    If you are not familiar with how to make a magic ring, this is a great tutorial to explain it.

Rnd 1:  In a magic ring make 6 sc.
       2:  Make 2 sc in each st.  (12 sc)
       3: *Sc in next st., 2sc in next st.* Repeat to end of rnd.  (18 sc)
       4:*Sc in next 2 sts., 2 sc in next st.*  Repeat to end of rnd. (24 sc)
       5 *Sc in next 3 sts., 2 sc in next st.* Repeat to end of rnd.  (30 sc)
       6:*Sc in next 4 sts. 2 sc in next st.* Repeat to end of rnd.  (36 sc)
      Rounds 7 through 11, Sc in each stitch around.
Rnd 12: *Sc in next 4 sts, sc2tog*  Repeat to end of rnd.  (30 sc)
       13 and 14  Sc in each stitch around..
       15: *Sc in next 3 sts.,  sc2tog*   Repeat to end of rnd.  (24 sc)
       16 and 17  Sc in each stitch around.
       18: *Sc in next 2 sts., sc2tog*  Repeat to end of rnd. (18 sc)
        19: Sc in each stitch around.
        20: *Sc in next stitch, sc2tog*  Repeat to end of rnd. (12 sc)
        Stuff your ‘Giggle’ and then sc2tog around until opening is closed. 
        Fasten off and  weave in the yarn end.

   To make the arms and legs visit this website for a great pictorial tutorial. 

   Attach your finished curlicues to the sides and bottoms of your ‘Giggle’ for arms and legs.

   Now, let your creative juices flow as you envision and create unique facial expressions.  I used felt shapes for the eyes and stitched them securely onto the ‘Giggle’.  If you decide to use safety eyes, attach them before you stuff and finish off your ‘Giggle’.  I used yarn to embroider on the mouth.  You can make the face as simple or as detailed as you like.

   For the hair I attached strands of yarn as if attaching fringe.  This tutorial does a great job of showing how to do this.

     So there you  have it!  Happy little monsters that are sure to make you smile!
Blessings!
Reny

Saturday, June 11, 2016

Welcome Summer!.... and new projects!

Whew!  It's been really busy lately what with visiting kids, etc.  But we're back home and getting into our summer groove.   We had a great trip to the Cleveland area to visit kids and grandkids.  We didn't get to see everyone, but maybe next trip.

Of course I took a crochet project or two.  I was able to finish this sweet little summer vest for my daughter.  She makes such a great model.   Sorry, I didn't get a close-up of the stitches.  But still, you can get a general idea of what it looks like.

I also finished this little crochet clutch after I got home.  I just needed something small and understated to carry to a wedding.  This was perfect.  I love the vintage button closure and the smart shell-stitch.

I love this little clutch purse and will probably use it often.  I may even make one in bright colors and add a shoulder strap for a cross-body bag.  Have I said these are really fun to make?  The free pattern can be found here.

Friday, April 1, 2016

Road Trip Scarf

     The first time I saw this scarf on Pinterest, I fell in love with it!  I love the open weave of the stitch, the unique scalloped border and the dainty flowers with the added twisted braids on the ends.  While most triangular scarves are worn with the point in the back, this one is designed to wear the point in the front with the two ends wrapped around the back of the neck and draped to the front as well.
   
     I finally got around to making my own.  I just happened to have a remnant of yarn, so I got to work.  As often happens when I try to use up some of my stash on a project,  I didn't have enough to finish, so had to go buy more.  Luckily, Walmart still had some to match.


                          Many thanks to Zooty Owl for sharing her design and free pattern.