Showing posts with label christmas. Show all posts

Saturday, October 6, 2018

Christmas Nativity Play Set Part 4

This post may contain affiliate links.*

Sheep
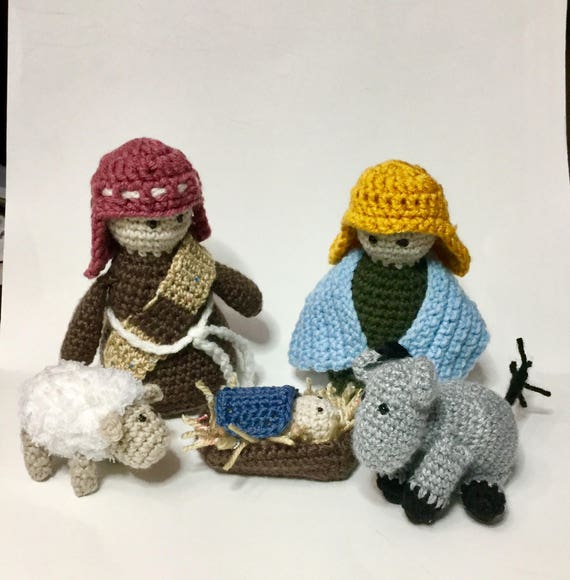
This is the last section of this play set.   I hope you have enjoyed making it and that your littles will enjoy playing with it while they learn the Christmas story.

image 0

Sheep
With brown yarn, make 6 sc in a magic ring.
Inc.  (12)
3-6.  Sc in each stitch.  (12)
7.  To form ears,  sc in 4, ch 4, sc in 2nd ch from hook, hdc in 3rd and 4th chains, sc in ch. space, sc in 4 sc, ch. 4, sc in 2nd ch from hook, hdc in 3rd and 4th ch. sc in ch space, sc in remaining sc in rnd.
8.With fluffy white yarn,(I use Bernat Pipsqueak)  sc in each stitch folding ears forward and working around back of them as you go.  (12)
9.  Make 18 sc this round.  It is hard to see individual stitches with this yarn so just try to place them evenly around.
10-13.  Repeat round 9.
14.  Start dec when you feel your sheep is about the size you want him.  Fasten off and weave in yarn.

Legs.  Make 4
 With brown yarn, Make 5 sc in a magic ring.
2-5.  Sc in each stitch.
Fasten off, stuff and attach to underside of sheep.


If you feel really ambitious, you could make a flock of sheep and using the Joseph pattern make some shepherds.  I think that would be a cute addition to this play set.

Blessings!
Reny

*We are a participant in the Amazon Services LLC Associates Program, an affiliate advertising program designed to provide a means for us to earn fees by linking to Amazon.com and affiliated sites.
Monday, October 1, 2018

Christmas Nativity Play Set Pattern Part 3

Christmas Nativity Play set Pattern Part 3


image 0


Donkey
Head
 Make 6 sc in a magic ring.
Inc. in each st.  (12)
*Sc 1, inc*  (18)
4-9  Sc in each stitch.
10.  *Sc in 2, inc.*  (24)
11.  *Sc in 2, dec.*  (18)
12.  Sc in each stitch.
13. *Sc 1, dec* (12)
14. *Dec*  (6)  Stuff head.
15. Dec. till closed.  Fasten off leaving tail to sew to body.

Ears  Make 2.
 Make 6 sc i a magic ring.
Inc.  (12)
Sc in each stitch.  Fasten off, leaving tail to sew to head.
Pinchone end together and sew ears to head.

For hair, loop several strands of black yarn onto top of head.

Body
 Make 6 sc in a magic ring.
Inc.  (12)
*Sc 1, inc* (18)
*Sc 2, inc* (24)
*Sc 3, inc* (30)
6-10.  Sc in each stitch.  (30)
11.  *Sc 3, dec.*  (24)
12. Sc in each stitch.
13.  *Sc 2, dec*  (18)
14-16  Sc in each stitch.
17. *Sc 1, dec*  (12)
18. Sc in each stitch.  Stuff body.
19.  Dec till closed.  Attach head to body.

Donkey legs.  Make 4
 With black yarn,  Make 5 sc in a magic ring.
Inc.  (10)   Change to main donkey color.
3-8.  Sc in each stitch.   Stuff  Fasten off leaving tail to seew to body.
Attach legs as desired or as pictured.


Tail.
Chain 7, slip stitch in 2nd chain from hook and each chain.    Attach loops of yarn to end of tail and sew tail to backside of donkey.

If you are enjoying my blog and would like to be sure not to miss anything please click this follow link and sign up!

Blessings!
Reny

Tuesday, September 25, 2018

Christmas Nativity Play Set Crochet Pattern part 2 Baby Jesus and Manger

image 0


Part 2 
Baby Jesus and Manger

(See part 1 for the pattern for Mary and Joseph)                                 


Manger  worked in rows.
1,  Ch 13, sc in 2nd ch from hook and each ch.  (12)  Ch1, turn
2.  Sc in each stitch.
3  Repeat for a total of 24 rows.

Fold down 5 rows on each end and sew along edges.


Head and foot of manger
 Ch 7, sc in 2nd ch from hook and each ch.  (6)  Ch1 and turn.
2-5  Repeat
6.  Sc around 3 sides. Fasten off leaving long tail to stitch head and foot to ends of manger. 

Bed of straw
Ch 7, sc in 2nd ch and next 5 ch.  3 sc in next, sc in 5 chs on opposite side of ch, 3 sc in last.  Fasten off For straw,  cut abotu 50 strands oyellow yarn approximately 3 inches long.  Fasten loops of yellow yarn to each stitch around.  Trim if desired.  Place straw in manger.


Baby Jesus
 Make 6 sc in magic ring
Inc. each st.  (12)
*Sc 2, inc.*  (18)
4-6  Sc in each stitch
7.  *Sc 2, dec.*  (12)
8.  *Sc 2, dec*  (9)
9.  *Sc 2m inc.*  (12)
10-13.  Sc in each stitch.
14.  *Sc 2, dec.* (9)
15.  Stuff.  Dec till closed.  Fasten off and weave in ends.
Crochet a little blanket or make one of fabric to swaddle the baby in.

Blessings!
Reny


Monday, September 17, 2018

Free Crochet Nativity Play Set Pattern Part 1

This post may contain affiliate links.*


Christmas is coming!!!

My grandchildren have always loved playing with the nativity that is traditionally displayed at our house over the holidays, so I decided to design a soft, durable one for them.  

This pattern has several different pieces to it, so I will post it bit by bit over the next few weeks in the interest of space saving.  The entire pattern which includes several photos can be purchased in my Etsy shop if you want it all at once.


image 0
Crochet Nativity Playset

This crochet Nativity set includes Mary, Joseph, Baby Jesus, a donkey and a sheep.  Also included are the shawls, head pieces and manger.  While there are many parts to this pattern, the stitches are simple and the instructions are fairly easy to understand.  Both Mary and Joseph have round circles of plastic canvas in the bottom to give them a flatter surface to help them stand. 


Materials Needed:
Worsted weight yarn
Fluffy yarn  (I use Bernat Pipsqueak)
G crochet hook
yarn needle
safety eyes or puff paint

Abbreviations:
sc-  single crochet
hdc-  half double crochet
dc-  double crochet
inc- make 2 stitches in 1 stitch
dec- crochet 2 stitches together
blo- make next stitch in back loop only
sl st- slip stitch
ch- chain


Mary and Joseph  


Both of these basic characters are made the same, but have different colors and accessories.  The bodies are crocheted in the color you choose for the clothes with a change in color for the head.  Arms are made to match the body.

 Make 6 sc in a magic ring.
Make 2 sc in each stitch.  (12)
*Sc 1, inc*.  (18)
*Sc 2, inc*  (24)
*Sc 3, inc* (30)
*Sc 4, inc* (36)
*Sc 5, inc* (42)
Sc in BLO of each stitch
9-11 Sc in each stitch
12.  *Sc in 5, dec*  (36)
13.  Sc in each stitch
14.  *Sc in 4, dec*  (30)
15.  Sc in each stitch
16.  *Sc in 3, dec*  (24)
17-22.  Sc in each stitch.
23.  *Sc in 2, dec*  (18)  Place 3 inch diameter circles of plastic canvas into bottom of figure to keep bottom flat. (I used 2 circles in each one.) 
24.  *Sc in 1, dec*  (12)
25.  Change to flesh colored yarn.  Sc in each stitch. (12)
26.  Make inc in each stitch.  (24)
27.  *Sc 3, inc*  (30)
28.  Sc in each stitch
29.  *Sc 3, dec* (24
30-32  Sc in each stitch
33. *Sc in 2, dec*  (18)
34. *Sc in 1, dec*  (12)  Stuff firmly.
35,  Dec. till closed.  Fasten off and weave in ends.

For the eyes, either place safety eyes before stuffing and closing or place dots of puff paint.


Joseph’s Headcover

 In a magic ring make a chain 3 and 12 dc.  Join with a sl st.
Ch. 3, dc in same stitch as chain,  *dc, inc, dc*  dc in same stitch as chain,   sl st in top of ch 3.  (20 dc +1 ch 3)
Ch 3, dc in each stitch.  (20 dc +1 ch3)
Work in rows now.  Ch 3, dc in same st as ch 3, dc in 9, inc in next st.  Turn.
Ch 3, dc in same st., dc in 10, inc in next st.  Turn.
Ch 3, dc in same st., dc in 12, inc in next st.
Continue around head piece to make edge.  sc up side of cover, sc in each dc across front  (10 sc), sc 6 down other side., sc 15 across bottom.  Fasten off and weave in ends.

For Mary’s head cover, repeat as for Joseph but add 1 additional row of sc.

For Joseph’s headband, ch 40, fasten off.  Weave through head covering stitches as shown in pic.

Arms  Make 2 for each figure

Using yarn to match clothes, 
 Make 6 sc in a magic ring.
Inc. each st.  (12)
3-5.  Sc in each st. (12)
6.  *Sc 2, dec.*  (9)
7-10.  Sc in ea st.  (9)  Stuff lightly.
11  Sc open edge of arm together with 4 sc.  Fasten off leaving a long tail to sew arm to body.

Joseph’s scarf
 Ch 6, sc in 2nd. ch from hook and next 4 chains.  (5)  Ch 1, turn.
Sc in each st., ch1, turn.
Repeat row 2 until you have the length you want, making color changes as desired for stripes.  Fasten off and weave in ends.

Joseph’s belt
Make a chain as long as you want the belt to be and tie it around his waist.

Mary’s shawl
 Ch 31, sc in 2nd ch from hook and each ch.  (30)  Ch 1, turn.
Sc in each stitch, ch 1, turn.
Repeat for a total of 9 rows.  Fasten off and weave in ends.


Check back next week for the Baby Jesus and manger pattern.  See you then!

Blessings!
Reny

*We are a participant in the Amazon Services LLC Associates Program, an affiliate advertising program designed to provide a means for us to earn fees by linking to Amazon.com and affiliated sites.

Monday, August 6, 2018

Week 6, Cute Little Monsters Christmas Ornament Crochet-a-long

≠≠≠
 What better way to decorate a Whimsy Tree than with cute little monsters with silly grins and crazy hair. 

In case you missed the beginning of this Crochet-a-long, check out this post for more info.

https://renysplace.blogspot.com/2018/06/christmas-crochet-long-new-ornament.html

This was my very first crochet pattern design and it was so well received that I have decided to offer it again to my readers!
    I absolutely adore bright colors and funny expressions. At our house we call it the 'cuteness factor'.  It is what I strive to achieve in all my varmint creations.  At times this means making several tries before it meets the requirements.  But the satisfaction of finally getting it right is so worth it!

   These little monsters are about 3 inches tall and are just the right size for little hands to carry around.  And I wish I could describe to you the delight we see in every child who has received one of these.  Big smiles, audible giggles as they toss them up in the air or hug them close to their little chests.    The wonder is that such a simple little monster could elicit all that.


    So I invite you to  enjoy this free crochet pattern.  I suggest you make several for adorable Christmas gifts.  And keep some extra's around for little visitors.  I try to do this and it is such a great help to parents when their child has something special to play with during the visit.  And then I send it home with them!


    All you need to make this free crochet pattern are some bits of leftover yarn, stuffing and some felt for the eyes.  Be sure to stitch eyes, arms and legs securely if you plan to give one of these to a baby.


   Once you have completed one, it's hard not to make more.  And the more you make, the more delighted your littles will be!


                                 Giggle Monster Pattern

Materials:
Worsted weight yarn
G crochet hook
fiberfill for stuffing
felt for eyes (or may use safety eyes if you like)
needle and thread to sew on eyes
yarn needle for weaving in ends

   This pattern is worked in rounds and I used a running stitch marker to keep track.  An understanding of basic stitches and general crochet terms is helpful.

    If you are not familiar with how to make a magic ring, this is a great tutorial to explain it.

Rnd 1:  In a magic ring make 6 sc.
       2:  Make 2 sc in each st.  (12 sc)
       3: *Sc in next st., 2sc in next st.* Repeat to end of rnd.  (18 sc)
       4:*Sc in next 2 sts., 2 sc in next st.*  Repeat to end of rnd. (24 sc)
       5 *Sc in next 3 sts., 2 sc in next st.* Repeat to end of rnd.  (30 sc)
       6:*Sc in next 4 sts. 2 sc in next st.* Repeat to end of rnd.  (36 sc)
      Rounds 7 through 11, Sc in each stitch around.
Rnd 12: *Sc in next 4 sts, sc2tog*  Repeat to end of rnd.  (30 sc)
       13 and 14  Sc in each stitch around..
       15: *Sc in next 3 sts.,  sc2tog*   Repeat to end of rnd.  (24 sc)
       16 and 17  Sc in each stitch around.
       18: *Sc in next 2 sts., sc2tog*  Repeat to end of rnd. (18 sc)
        19: Sc in each stitch around.
        20: *Sc in next stitch, sc2tog*  Repeat to end of rnd. (12 sc)
        Stuff your ‘Giggle’ and then sc2tog around until opening is closed. 
        Fasten off and  weave in the yarn end.

   To make the arms and legs visit this website for a great pictorial tutorial. 

   Attach your finished curlicues to the sides and bottoms of your ‘Giggle’ for arms and legs.

   Now, let your creative juices flow as you envision and create unique facial expressions.  I used felt shapes for the eyes and stitched them securely onto the ‘Giggle’.  If you decide to use safety eyes, attach them before you stuff and finish off your ‘Giggle’.  I used yarn to embroider on the mouth.  You can make the face as simple or as detailed as you like.

   For the hair I attached strands of yarn as if attaching fringe.  This tutorial does a great job of showing how to do this.

     So there you  have it!  Happy little monsters that are sure to make you smile!
Blessings!
Reny

Sunday, March 13, 2016

Giggles!


    While working from patterns is very rewarding, there is also great satisfaction in working up my own designs.  I love making cute, whimsical little creatures that bring a smile to faces.  ‘Giggles’ is one of those creations, and I offer this free pattern to all my fellow crocheters.  This little creature is pretty simple and works up fairly quickly.    I think these would make an adorable addition to an Easter basket or any festive occasion.  I may decorate my tree with them this next Christmas.

Materials:
Worsted weight yarn
G crochet hook
fiberfill for stuffing
felt for eyes (or may use safety eyes if you like)
needle and thread to sew on eyes
yarn needle for weaving in ends

This pattern is worked in rounds and I used a running stitch marker to keep track.  An understanding of basic stitches and general crochet terms is helpful.

   If you are not familiar with how to make a magic ring, here is a great tutorial to explain it.

Rnd 1:  In a magic ring make 6 sc.
       2:  Make 2 sc in each st.  (12 sc)
       3: *Sc in next st., 2sc in next st.* Repeat to end of rnd.  (18 sc)
       4:*Sc in next 2 sts., 2 sc in next st.*  Repeat to end of rnd. (24 sc)
       5 *Sc in next 3 sts., 2 sc in next st.* Repeat to end of rnd.  (30 sc)
       6:*Sc in next 4 sts. 2 sc in next st.* Repeat to end of rnd.  (36 sc)
      Rounds 7 through 11, Sc in each stitch around.
Rnd 12: *Sc in next 4 sts, sc2tog*  Repeat to end of rnd.  (30 sc)
       13 and 14  Sc in each stitch around.
       15: *Sc in next 3 sts.,  sc2tog*   Repeat to end of rnd.  (24 sc)
       16 and 17  Sc in each stitch around.
       18: *Sc in next 2 sts., sc2tog*  Repeat to end of rnd. (18 sc)
        19: Sc in each stitch around.
        20: *Sc in next stitch, sc2tog*  Repeat to end of rnd. (12 sc)
        Stuff your ‘Giggle’ and then sc2tog around until opening is closed. 
        Fasten off and  weave in the yarn end.

To make the arms and legs visit this website  for a great pictorial tutorial. 

Attach your finished curlicues to the sides and bottoms of your ‘Giggle’ for arms and legs.

Now, let your creative juices flow as you envision and create unique facial expressions.  I used felt shapes for the eyes and stitched them securely onto the ‘Giggle’.  If you decide to use safety eyes, attach them before you stuff and finish off your ‘Giggle’.  I used yarn to embroider on the mouth.  You can make the face as simple or as detailed as you like. 

Tip: I have found it easier to sew on the face before stuffing the 'giggle'.

For the hair I attached strands of yarn as if attaching fringe.  This tutorial does a great job of showing how to do this.

I hope you enjoy making these as much as I did!  I would love to see pics of your ‘Giggles’ in the comments below.

                                                                                    Blessings!

                                                                                       Reny

Thursday, December 8, 2011

Pinterest....A world of Wonder!

Here are my versions of two handmade greetings from Pinterest.  I simply adore the colors and the way these are put together.  Of course the originals are much more striking than my copies, but I try to use the materials I have on hand.  I also have to cut out some of the images by hand since I don't have a large collection of cutting dies.  This makes it quite time intensive.  However, I am delighted with the finished products and these cards will go to some special people on my list this year.
A special thanks to my Sis, who always sends these special 'pins' my way.
 Love you, Sissy!!!!!

Wednesday, December 7, 2011

Christmas!!!

Normally I go all out for Christmas, but this year I'm scaling back.  Money is tight for most of us these days, and Christmas time brings with it the potential for all kinds of stress.  I've spent years trying to find just the right gift, or the most interesting way to package a gift.  I've given expensive gifts that often end up in the trash, on the floor or at the Goodwill.

I'm opting out of all that this year.  The gifts we give will be small and practical.  I'm hoping the gifts we receive will be small and practical as well.  I would much rather spend some quality time with those I love.  I'd like to have a bushel basket full of sweet memories this year. 

That said, I still love this time of year!

Tuesday, October 14, 2008

Easy Christmas Gifts

So, all these marvelous handmade cards I am now collecting are serving as my packaging for my 'non-clutter Christmas'. Yes folks, at the risk of shocking all you Christmas giving traditionalists, I am giving cash this year. These beautiful cards will be the package and gift wrap for my gifts. And for those who feel the need to have a memento of the gift, the card will serve the purpose. It can be framed, scrap-booked, stashed or just scraped. Whatever suits the recipient is fine with me. They can then use the cash for whatever they would really like to have. No more unwanted and disappointing gifts and no more useless clutter.

And for me, no more giving anxiety. No more searching for the perfect item just to find it in the charity box in a few months. In today's economy, I have no desire to waste my money on something that may or may not be the right thing. And as I grow older, I find that the simple life suits me much better. The chaos of Christmas shopping no longer appeals to me. And I no longer feel the need to do things just because that's the commonly accepted way.

So, call me Scrooge, or the Grinch if you like. Or even rebellious. But I think it's time to live life a little differently. I'm done competing with the 'Jones's".

That said, I do have plans for a wonderful holiday celebration with my family and friends. But that will be another post.

Monday, October 13, 2008

Handmade Holiday Greeting Cards


This year I am endeavoring to give beautiful personalized handmade cards to all my family and a few close friends. My friend, Gina, from BabyFishDesigns is such a great help to me in this project. Having tried making my own cards, I found that it is a time consuming task that requires lots of creativity. Since my time is limited, and my creativity does not lean toward paper crafts, I am doing the next best thing. I am having them made. While Gina has some outstanding items in her lovely Etsy shop, I tend to hit the custom request most of the time. I have found her to be exceptional in creativity and in promptly getting to work on my request. With just a little bit of information about the recipient of the card, she is able to create cards that perfectly fit the occasion and the person. And did I mention that her prices are exceptional as well? I could not buy such a perfect card at the card shop for the same low price. I was especially delighted with a 'rush' order for a birthday card just recently. As I placed the card in the envelope, I noted that the butterfly on the card was repeated on the envelope! How perfect is that!? Such attention to details is what makes me return again and again. Please visit her shop at:

Sunday, October 12, 2008

Christmas is Just Around the Corner...

..And I'm doing something different this year. With a scary economy, I think everyone is rethinking their approach to holiday giving. We give so much stuff to so many who are already living with excess. Our houses are cluttered with things, making it difficult to clean and keep things tidy. I know of some people who rent storage sheds to keep their excess things in. Others of us have closets, basements, attics, garages and sheds filled with things we no longer need or want, but are afraid to get rid of because "we might need it someday" or "Aunt Jane gave me that. She might be offended if I get rid of it."

My husband will testify that I have been on a crusade to de-clutter our home for several years now. It takes awhile to decide what to keep and what to let go of when you have a lifetimes worth of stuff accumulated. But we are making progress.

"So, what does this have to do with Christmas?" you may ask. Well, this is the time of year when 'things' make their way back into our lives in a subtle and seemingly innocent way. We are all big-hearted people who are accustomed to showing affection through gift giving, which usually redounds to 'more stuff' in every household. Stuff that brings delight for a short time, but then ends up in a closet or corner until someone has the courage to get rid of it.

Surely, there is a better way to celebrate the holidays. I will be posting a couple of my ideas of ways this might be accomplished in future posts.

Wednesday, September 10, 2008

Cute Little Snowmen


My latest bead project is now listed in my Etsy shop. These sweet little snowmen were quite a challenge. Everything had to be added before oven curing these little guys and trying to get all the little textures right and still hold the shape of the bead almost made me give up on them several times. I would love to make more of them, but I'm going to have to find a better way to do them first. Any clay artists out there with some advice for me????

Monday, September 8, 2008

Lazy Monday

What a lazy day. I've just been sitting around, reading some blogs, doing a bit of housework, (yuck) and preparing some packages for the mail. I have traded off my Christmas Tree beads, so I should make another set to list. Maybe I'll get to that this evening.

Ho hum. I am badly in need of some motivation. 'sigh'

Tuesday, September 2, 2008

Christmas is Coming!


Christmas will be here before we know it, and I have started creating some fantastic Christmas beads. Check these out, and let me know what you think.