Saturday, December 15, 2018

A Personalized Crochet Baby Book Keepsake


It has been my goal this Christmas to make something for each grandchild and great-grandchild.   That's what grannies do, right? 

Well, this little crochet baby book is the last item to be completed.  Whew!  This one was a challenge for me, not because of the difficulty of the stitch or assembly, but because of all the different colors and multiple strands of yarn that had to be managed while crocheting the pictures into the pages.

I've seen some some very elaborate graphgans on Pinterest, and I marvel at the patience of these yarn artists.  Oh my goodness!  How do they do that!?  If you haven't looked at some of these, you should go to Pinterest (as soon as you finish reading my blog) and search 'graphgans'.  You will be amazed!

Not only that, many of those patterns are free.  And in addition to that....there are websites that will help you create your own patterns!

So, if you have the time and patience to do it, you can create some awesome keepsakes for those special people in your life.

But I digress.  Here is my feeble attempt at this crochet art form, which I hope to improve in as I do more of it.


Bentley is our 10th. grandchild, and such a cutie!
What a wonderful gift of love he is to us!


We are so blessed with children,  grandchildren, and 
great-grandchildren!


It's a happy riot in our little house when
    they all come home, but what a 
        wonderful time!!!


   I hope your holidays will be filled with as much love, fun and laughter as ours will be!  It truly is all about relationships!


Blessings!
Reny


Friday, December 7, 2018

Whimsy Christmas Tree finished!

I am delighted with my Christmas tree this year!  Well, I always love my tree, but this year is special.  I decided several months ago to have a tree covered with whimisical crochet ornaments.  And in addition to that, I will be giving these ornaments away to friends and family that grace our home with a visit during the holiday season.

With that in mind, I set myself to  surf Pinterest and other websites about crochet amigurumi in search of patterns and ideas that I thought would delight my grand-children and great-grandchildren.

Almost every ornament on this tree is featured on a blog post complete with links to patterns or have the patterns themselves included if the pattern was one of my own designs.  Most of the patterns from other designers were free, but I also have no problem paying for a pattern if it looks like a good one.

I may still add a few more ornaments if some great ideas present themselves, but for the most part I think I'm finished with this project.  

I would still like to make a nativity set or two if I have the time.   The pattern for that can be found elsewhere on my blog if you would like to make one yourself.

Below are the links to most of the ornaments I have made for this tree.  


I hope your holiday projects are going well and that you  have time to reflect on the real reason for the season.

Blessings!
Reny

Tuesday, December 4, 2018

Christmas Santa Boot Crochet Ornament, Gift, Favors

     Christmas is almost here and if you are like me you are always looking for that  handmade little gift that says, 'You are special'.  This little boot ornament was designed with my newest grandchild in mind to help commemorate his first Christmas and to serve as an alternative to the traditional Christmas stocking.  To fill it I'll probably try to find a few helpful little trinkets for his parents as he is only 3 months old and candy is off the table right now. 

This would make a great teacher gift filled with teacher related items or some nice chocolates.   Or use it as a Christmas party favor filled with neat treats or gift cards.


     But I love the size of this little boot.  Approximately 4 inches tall, it makes a perfect addition to the tree as well.  


So here is the pattern.  Enjoy!
Crochet Christmas Santa Boot Ornament


Materials:
Worsted weight yarn  (Black, Red, White and a bit of gold)  I used Red Heart With Love Metallic for                                                                                                                          the red and white.
G hook 4.0 mm
Yarn needle
Plastic canvas  (to reinforce the sole of the boot.)

Boot sole:  (with black)
1.  Chain 11.  Sc in 2nd ch from hook and in next 8 chains.  3 sc in last chain.  Turn work and work on opposite side.  Sc 9,  Place stitch marker to keep track of rounds.  
2.  3 sc in first st.  Sc in 9 sc,  2 sc in each of next 3 st., sc in next 9 sc.
3.  2 sc in each of next 3 sts.,   sc in 9,   *2 sc in next st,  1 sc in next*  X's 3,  sc in next 9 sts.
4.  *2 sc in next st, 1 sc in next*  X's 3.
Fasten off and weave in ends.

Boot: (with red)
1. Attach red yarn at center back of sole and sc in each stitch around in back loops only for this round only.  Place stitch marker at beginning of this round.
2.  Sc in each stitch, both loops.
3-5.  Sc in each st.
6. Sc in 15,  decrease X'x 5,  sc in remaining stitches.
7.  Sc in 12, dec X's 4,  sc in remaining stitches.
8.  Sc in 12, dec X's 3,  sc in remaining stitches
Cut an oval of plastic canvas the size of the sole and place it inside the boot at this time.
9-18.  Sc in each stitch.  Fasten off red after round 18 and attach white.
19.  Sc in each stitch.
20. Chain 3.  Make a puff stitch in the same space at the chain 3.  *Skip 1 stitch, make a puff stitch*  repeat to end of round.  Join with a slip stitch and fasten off.  Weave in ends.

If you are unfamiliar with how to do a puff stitch, this  short tutorial will tell you how to do it.

To finish the sole of the boot,  attach black to the center back of the sole in the open front loops of the 4th round of the sole.  Holding the boot upright, slip stitch in each exposed front loop, join to first st. and fasten off.  Weave in ends.

Belt:  With black yarn
1.  Chain 3, sc in 2nd chain from hook and next chain.  Chain 1 and turn
2.  Make 2 sc, ch 1 and turn.
Continue until belt is long enough to go around boot.  Leave a length of yarn to stitch belt together.

Belt Buckle:
Chain 12.  Stitch the chain on to the center of belt in a square shape.  

Attach the belt to the boot.

Make an optional hanger if you desire by chaining and making a loop to attach to the top back of the boot.

Congratulations!  Your Santa boot is finished.  Enjoy!  


Thursday, November 29, 2018

Crochet a Character Christmas! Pokemon, Mario, Minecraft inspired gifts.

Of all the things I crochet for my kids and grandkids, the game characters are the most popular.  I have made quite a few character softies, beanies and earflap hats.  If you are having trouble knowing what your littles  might like, look at the video games and TV shows that they are so captivated by.

My latest project is a Pikachu earflap hat for my grand-daughter.  I finished this hat within two days of intermittent crochet using my favorite earflap hat pattern from Micah Makes.  The pattern embraces a whole range of sizes from infant to adult.

I made the ears, eyes, etc. by looking at a pic and free-handing them.  Since this was not my first Pikachu hat, I had a bit of an advantage.  I was familiar with how to shape the ears.  The rest of the face is simple circles and a triangle sewn on.  The mouth is just embroidered on.  The instructions for the Twisted Ties  were found on Youtube. 


This Captain America hat also took about two days.  The most difficult thing on this hat was the wings.  For more information on how I pulled this one together, see this blog post.


This creeper is the one thing I thought would be a breeze, but it took longer than I expected and I did a lot of 'frogging'.  (Needle craft jargon for ripping out.)   Finally, I got him the way I think he is supposed to look.  I'm really not sure since I haven't actually seen anything but pics of this guy.  (Don't tell my grandson, please.)


This Bowser earflap hat took several days.  The facial features had to be redone several times before I got him to look just menacing enough with out being too scary.   You can find details about this hat here.


Of all the things I have made for Christmas this year, this Bowser was the most difficult and time consuming.   I counted over 100 components when I began to assemble this guy.  Hope my Paul will love it enough to warrant all the work!  You can read all about this adventure here.


 I have several Pokemon enthusiasts in my family and these Pokeball beanies were just perfect for them as the fall weather turned to winter.  These are easily completed within a few hours.


Last, but not least, I crocheted this Pete the Cat inspired earflap beanie for my great-grandson's birthday.  I am told he loves it!


So, if you are still wondering what to whip up for your little ones for Christmas or any other occasion, consider these options.  A little yarn, a little time and you can present them with something very special!

Hope this gives you a little inspiration. 

Thanks for stopping in to read my blog.
Blessings!
Reny

Saturday, November 24, 2018

Crochet Buffalo Plaid....

Ok guys,  my daughter says that buffalo plaid is the hottest trend for this holiday season.  While I'm not that much into keeping up with trends, I do love a challenge.  So I made a web search of crochet buffalo plaid and found this awesome site with lots of videos and tutorials about how to do the buffalo plaid stitch!  Whistle and Ivy give great instructions and have a host of patterns, both paid and free.

This beanie and baby earflap hat are my first projects with Buffalo Plaid.


Obviously there are many sites out there that are showing how to do this stitch.  If you search Pinterest for it you will find buffalo plaid hats, scarves, throws, slippers and even tree ornaments.

The stitch is really easy to do as it uses common crochet stitches and color changes.  The biggest challenge is to keep your yarn from getting tangled.  But the blog I went to for learning this stitch even gave tips on how to keep those tangles to a minimum!

So far I have made 2 items with buffalo plaid.  But I'm thinking of more.  I'm also thinking of experimenting with different colors.


   I love the way this beanie turned out!


I have to say that it takes me a little longer to do this stitch because of the frequent color changes.  But I do love the look of my finished hats!

This is Boris.  He models my little baby hats and
my doggie hats.   Can't wait to see my baby Bentley
in this  earflap beanie.


I hope this post inspires you to give this a try.  It's the perfect pattern to crochet something for the guys on your Christmas list.  And it looks great on the gals too!

Happy Crocheting!
Reny

Sunday, November 18, 2018

Creeper meets Captain America! This weeks projects.

If you have children in grade school, then you have likely heard of Minecraft.  And if you have heard of Minecraft then you surely have heard of Creeper.  Now I seriously have no idea what part Creeper plays in the Minecraft scenario, but I know that my grandson loves him.  (Or is it a her?)  So, of course, I did what any good crocheting grandma would do.  I made him one!


I used the pattern from this site and it worked up nicely.    I decided to reinforce the 'square' shape by putting plastic canvas on the inside and stuffing inside the canvas armature.  I think this helped to  define the shape a bit.  I also tweaked the feet as my first attempt at them produced huge feet that looked all out of proportion to the rest of the creeper to me.   I cut the face out of felt and hot glued it on, but it could have easily been crocheted and stitched on instead.


At any rate, I'll bet it gets a smile,  along with the Creeper beanie I made for him.


My second project to finish this past week is this Captain America Earflap beanie.    Quentin, our good friends' grandson, is an occasional visitor to our home and is always fascinated by  the Yarn Varmints scattered all around.  He also loves super hero's, so this  beanie is for him.


I started out with a pic from Pinterest and  my favorite earflap beanie pattern.    I was pretty much able to  wing the emblem, but I didn't try to 'wing' the wings.  I found  the wing pattern here.  It was a little fussy but  I got it done.  The finished beanie turned out pretty good.  I hope Quentin will be pleased.


Next on my hook?  A custom order for a friend and a fun Mystery Crochet-a-long from A Crochet Simplicity,  an awesome website and Facebook community.  Check it out!

Thanksgiving is this this week, so I wish you all a very Happy Thanksgiving day!  As I reflect on all the things I am thankful for, my heart overflows!  I hope you are having the same experience!

Blessings!
Reny

Sunday, November 11, 2018

Crochet Bowser Inspired Earflap Hat

My grandson loves Bowser, so I am trying to make him some Bowser inspired gifts this Christmas.

I've seen a lot of cute character hats to crochet, but finding a Bowser hat that I liked was only semi-successful.  I found a picture on Pinterest that was very close to what I wanted to make, but no pattern, and the Etsy listing for the hat was no longer available.


So I did what any resourceful granny would do.  I improvised!   Having just finished this Bowser amigurumi, I had a pretty good idea of the shapes I needed to make to pull this project off.  So I got to work.

First I found a simple pattern for a cute earflap hat.  The link for that free pattern can be found at Micah Makes.  I made this hat in dark green and finished it except for the ties. 


Next to add the features.   I decided to start with the horns.  (Clarification.  11/8/2021)  Repeat all instructions until you reach the end of the round.  Your final stitch count on each round should match the number in the ( ).

1.  Make 4 sc in a magic circle
2.  *Sc in 1, inc*  (6)
3.  Sc in each st.  (6)
4.  *Sc in 1, inc*  (9)
5.  Sc in each st.
6.  *Sc in 1, inc.*  (13)
7.-8.   Sc in each st.
9.  Dec.  Sc in  remaining sts.  (12)
10.  *Sc in 1, inc.*  (18)
11.  *Sc in 5, inc.*  (21)
12.  Sc in each st.  Fasten off leaving tail.  Stuff and stitch to hat.

Horn ring:  make 2
1.  Chain 21.  Sc in 2nd ch from hook and each additional chain.   Ch. 1 and turn (20)
2-3  Sc in ea. st. Ch. 1 and turn.
Fold in half lengthwise and sew into a tube.  Wrap around base of horn and stitch ends together.  Secure to horn base with a few stitches.


Next I  made the hair.  Make 5 or more and stitch to top of head.

1.  Make 4 sc in a magic circle.
2.  *Sc 1, inc.*  (6)
3.  *Sc in 1, inc*  (9)
4.   Sc in each st.  (9)
5.  *Sc in 2, inc. *  (12)
6.  Sc in each st.   (12)
7.  *Sc in 3, inc*  (15)
8-9  Sc in each st.  (15)
10.  *Sc in 4, inc*  (18)
11.  Sc in each st.
12.  *Sc in 2, inc*  (24)
13-16  Sc in each st.  Fasten off leaving tail.  Do not stuff.


The snout took me a couple of tries.

Large center disk:
1.  Make 6 sc in a mc.
2  Inc x's 6  (12)
3.  *Sc in 1, inc*  (18)
4.  *Sc in 2, inc*  (24)
5.  *Sc in 3, inc*  (30)
6.  Sc in each st.  (30)
7.  *Sc in 3, dec*  (24)
8.  *Sc in 2, dec*  (18)
Fasten off and stuff.  Set aside for now.

Smaller side disks:  Make 2.
1.  Make 6 sc in a mc.
2  Inc x's 6  (12)
3.  *Sc in 1, inc*  (18)
4.  *Sc in 2, inc*  (24)
5.  Sc in ea. st.   (24)
6.  *Sc in 2, de*  (18)
7.  *Sc in 1, dec*  (12)
Fasten off and stuff.

Now stitch smaller disks to large disk with large disk slightly overlapping the small ones.    Then stitch this assembled snout to front of hat about 1 or 2 rows from edge.  Take 2 long stitches on front of snout for nostrils and attach 2 triangles of felt for teeth to bottom of small disks.

Side tubes:  Make 2
1.  Chain 17,  sc in 2nd ch from hook and each additional chain. Ch 1 and turn.  (16)
2.-4   Sc in each st.  Ch. 1 and turn. (16)
Fold this piece in half lengthwise and stitch into a tube shape.    Sew to side of snout at bottom of hat.

Side balls:  Make 2
1.  Make 6 sc in a mc.
2  Inc x's 6  (12)
3.  *Sc in 1, inc*  (18)
4.  Sc in each st.
5.  *Sc in 1, dec*  (12)
6.  Stuff and dec till closed.
Sew to end of tube.

For the eyes I cut felt into the long triangular shape, added  small bit of black felt and stitched the eyes about 2 rows above snout.

Eyebrows:  Make 2
1.  Make 6 sc in a mc.
2.  Inc x's 6  (12) 
2-5  Sc in ea. st. 
6.  *Sc in 2, dec* (8)
7-20  Sc in each st.
Fasten off.   Flatten and form around felt eye and sew into place.

For the ties I used this video.


Congrats!  You're done!

And that's how you make a true Bowser fan happy!

Blessings and Happy Hooking!
Reny


Thursday, November 8, 2018

Bowser..A Crochet Pattern Review with some Helpful Tips

My grandson loves Bowser from the Mario Kart game.  I don't know why he chose a 'bad guy' as his hero.  He generally goes for the good guys like Batman and the "Credible Hulk".  But at this time, Bowser is the man!


He also loves anything that I make for him from 'yarn' and often makes specific requests which I love fulfilling for him!

So I started my search for a Bowser pattern, and I found one!  It's a great pattern and it's free.  What more could you want?    You can find this awesome pattern here.

The pattern stitches are simple and the stitch instructions are clear.  Any beginner can make Bowser if you are willing to take your time and crochet 101 pieces.  Yes!  That's right!  101 separate pieces to put together.  But if you have a Bowser aficionado on your Christmas list, it's well worth the effort.

I actually completed him within a couple of weeks by just working on him for short intervals.  He could probably be made in a couple of days if you stayed with it for several hours.  (I tend to crochet slower than most crocheters I know).

My Tips for this pattern:

I crocheted all the pieces first, keeping them together in a bin.  The pieces that called for decreasing and closing up, I stuffed as I went along.   Some of the pieces like the 'pipes' I did not stuff at all, so I would say stuffing those pieces may be optional.  They look fine on the finished Bowser.

The 'Lower Jaw Flap' is actually just a flat round piece that is attached to the bottom of the head after the head is assembled.  I had to go back through the patten as I assembled Bowser to identify some of the pieces.  Putting a label on them as you go would decrease the time spent on assembly.

For the collar and arm bands, I attached the spikes before I put them on Bowser.  That just seemed easier to me.  I  attached the fingernails to the fingers and then the fingers to the 'hand' (closed end0  end of the arms before stuffing the arms and attaching them to the body.

The feet were a bit confusing to me.  The foot piece is a slightly rounded piece with a large opening.  I couldn't see anywhere in the pattern instructions how to make this fit on the bottom (closed end) of Bowsers legs.  After studying the pictures, I decided to attach the toes to the 'front' of the foot, take a running stitch around the top and pull together just enough to bring the top to about the same diameter as the bottom of the leg.  I then stitched the foot to the leg bottom, stuffing as I went.  This  formed the foot to look like the pics.  The leg was then stuffed and attached to the bottom of the body.

The shell was my favorite part to put together, and I attached the white rim and the spikes before I attached the shell to the body.


I was not that impressed with the 'belly' part.  I thought the double crochet was a bit to open for my taste and I would probably change that to single crochet with more rows to make it fit over the front of the body or a half-double with more rows.  But that's just my  opinion.


I assembled the head separately as the pattern instructions suggested, but attached as many of the components as I could before attaching the head to the body.  In this way I was able to anchor the pieces by pulling the sewing yarn down through the head to the bottom jaw flap and securing it.


The eyes were a challenge.  I wanted to get the angry look without making him look too hostile.  I think everyone will just have to work on that issue themselves.  If you want, you could make him look quite harmless and adorable by giving him different eye placements or shapes.


When I had the head completely finished, I attached it to the body, stuffing  the collar portion as I went along.  The pattern suggests a piece of red felt sewn inside the mouth to close the hole.  I first made sure my head was sufficiently stuffed, then I crocheted an oval with red yarn and stitched it inside the mouth to close the hole.


So, there you have it!  Bowser is  completed!  Good job!

Hope this post was helpful as you make your Bowser.

Happy Hooking!
Reny


Thursday, November 1, 2018

Crochet a Christmas Gift for Your Pet! Crochet Ball Cap Pattern

This post may contain affiliate links.*


I love Facebook and Pinterest!  I get so many great ideas from these two sites.


One of the things that caught my eye was an ad that featured an adorable puppy with the cutest baseball cap on his little head.  The cap was designed so that his furry little ears poked easily out on each side.  The visor shaded his eyes, and he just looked so comfy and natural in this little hat that I just had to try to crochet one. 
Boris the crochet Bassett hound
never complains about modeling
accessories for me!
Well, I did it!


To make this doggie hat I used Red Heart Yarn and an H hook.   I stitched the parts together with a yarn needle and matching yarn.  

 
To determine the size you must measure the dogs head. 
Measure around the head by measuring across the forehead and under the ears to the back of the dog's head.  This will be the band of the hat.  Be sure to allow for a bit of overlap to sew the band together.

For the top of the hat measure from the back of the head to the forehead.  

To determine the width of the top, measure from ear to ear. 

You will now crochet a chain the length of the band measurement.  Make sc or hdc across the chain, turn and repeat for as many rows as will make the band the width you think will work well for your pooch.

Now make the top by making a chain the width of the top.  make sc or hdc across chain and repeat rows until you reach the measurement of the length from the forehead to the back of the head where the hatband will sit.  Before stitching this, make sure your length is  right for your pooch.  You may want to add a row or two to give the top some height.

Stitch the top to the hatband.  

Next crochet a semi-circle for the hat bill.  For this I used a sc and made it a nice tight stitch.  You can make the bill as big or small as you want by adding or subtracting rows.  Stitch the bill to the front of the hat.

The last step is to add a chin strap.  The length and position of the chin strap will be determined by the size and breed of your dog.  Crochet a tight chain the length you need and add a fastener that slides to keep the hat on the dog.  Attach the chain to each side of the bottom of the hatband under the ears.

Add any applique you like to the front to  make your doggie's hat unique!
Sophie in her new hat!


Congratulations!  You have completed your doggie hat.  Please share a comment and a pic of your pooch in his/her new accessory! 

Happy Hooking!
Reny

*We are a participant in the Amazon Services LLC Associates Program, an affiliate advertising program designed to provide a means for us to earn fees by linking to Amazon.com and affiliated sites. 


Red Heart Yarn

Friday, October 26, 2018

The Criss Cross Crochet Beanie. You wanna make this one!


This post may contain affiliate links.*


A couple of weeks ago I was surfing through my crochet Facebook groups and ran across a post from Loops & Love  asking for pattern testers.  I've always wanted to be a pattern tester, but up to now just didn't really know how to go  about becoming one.  So, of course, I applied.

This began a surge of beanie making that hasn't stopped yet!

I absolutely love this pattern!  The different stitches give it great texture.  It appears a bit complicated, but is really so easy.  The stitches are simple, but the way they are combined is just brilliant!  And  the color combinations are endless.  You can find this awesome free pattern at  Loops & Love.
.

The first beanie I made was with Universal Yarn,  Classic Shades Frenzy.  The color is HARBOR LIGHTS.    After the fact I decided to add a pompom just for fun and because this beanie is a Christmas gift for a 4 year old.  (This PomPom Maker is awesome and very reasonably priced!)


The second one was crocheted from Red Heart Stripes.   (The same yarn Loops & Love used for her beanies.)   One skein was enough for about one and a half beanies.  So for the third beanie I used the remainder of the Stripes yarn and then searched through my stash to see if I had any yarn that would keep the continuity of the colors to finish off the beanie.  I think I came pretty close!


So now I'm on a roll!  My Pokemon kids, decided they all need Pokeball beanies, sooooo......I used this same beanie pattern with a few minor changes. These are crocheted from Red Heart worsted weight acrylic yarn.   The ribbing is the same as the original Criss Cross Beanie Pattern, but as I started the body of the hat I used a simple half-double stitch throughout the remainder of the beanie.  As I  neared the place where decreases needed to be made, I decreased in one row and crocheted in each stitch in the next row until I reached the top, where I finished off the beanie with a yarn strand woven through the final row of stitches and pulled tight.   I then secured the end of this strand inside the top of the hat and wove in the ends.   This pulls the top together nicely.   The 'button' is simply a circle with a row of black around the edge to finish it off.


As you can see, this pattern is extremely versatile.  Instructions for different sizes are included.  Oh, and did I mention that this beanie works up quickly?  You could easily make one in a few hours time, even if you work slow like I do.


So hop on over to Loops & Love. and make everyone on your Christmas list one of these great beanies!  You'll be glad you did, and so will they!

Blessings!
Reny 


*We are a participant in the Amazon Services LLC Associates Program, an affiliate advertising program designed to provide a means for us to earn a small fee if
you purchase by clicking on a product link.  Hey, it helps pay the bills!

Tuesday, October 23, 2018

Crochet Pokeball Beanie for Our Littlest Pokemon Master

Our youngest grandson, Bentley, has been playing Pokemon since before he was born!  His momma and daddy and big brother Blane got lots of exercise prior to labor and delivery.  And they all still go out as often as they can to add more Poke Characters to their collection.   They must have hundreds by now!

The extent of my own Pokemon hunting has been following around my 10 year old grandson, Sam, as he 'taught' me how to play the game.  I'll tell you, he's a lot better at it than I am!

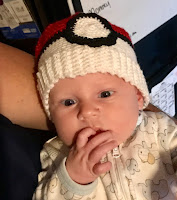
But one thing I can do is make things from yarn!  So I designed this adorable little beanie for Bentley.  While there are several similar beanie patterns out there, this one was designed especially for an infant in mind.  The yarn is soft and a little stretchy and the stitch is close for comfort and warmth.


Here is the pattern, designed for a baby's head. 

 Before I began, we measured the circumference of Bentley's head and used that measurement as my gauge.  The ribbed band on the hat needed to be about the same length as Bentley's head.  In his case, that was 16 inches.

This beanie is made from the band upward to the top.  I used single crochet stitches throughout.  The beanie is made from baby or sport yarn.  I just used what I found in my stash so I can't give you a brand name on this.  I used a G or 4mm hook.  You will also need a yarn needle to stitch on the button and to weave in ends.

Hat band:
1.With white yarn chain 8.  Sc in 2nd chain from hook and remaining 6 chains for a total of 7 sc.
2-72.  Sc in each stitch back loop only.  Chain 1 and turn.  Using the back loop on the band is what gives it the ribbed texture and a very neat look.   (Your band may need more or less rows depending on your head circumference measurement.)  Remember that the stitch count may be different from what I have listed if your measurements are different.

When your band is the length you need put the two ends together being careful not to twist it and slip stitch the ends to one another.  Do not fasten off yarn!  Turn the band so that the slip stitching is on the inside.  


Hat:
1.  Now sc in each row of the band to form the first row of the hat.  (72)  I use a running stitch marker to keep track of my rounds.
2-7.  Sc in each stitch.
8-10.  Change to black yarn.  Sc in each stitch.
11.  Change to red yarn.  Sc in each stitch.
12-13.  Sc in each stitch.
14.  *Sc in 7, dec*  (64)
15.  Sc in each stitch.  (64)
16.  *Sc in 6, dec*  (56)
17.  Sc in each stitch.  (56)
18.  *Sc in 5, dec*  (48)
19.  *Sc in 4, dec*  (40)
20.  Sc in each stitch.  (40)
21.  *Sc in 3, dec*  (32)
22.  Sc in each stitch.  (32)
23.  *Sc in 2, dec*  (24)
24.  *Sc in 1, dec*  (15)
25.  *Sc in 1, dec*  (10)
Fasten off leaving a long tail to sew top closed.  Thread the tail onto a yarn needle and weave the tail through the sc stitches of the last round.  Pull the yarn tail fairly snug so that the hole at the top is pulled closed.  Secure the yarn tail with a couple of stitches inside the hat to secure.  Weave in the end.

Button:
1.  With white yarn  make 6 sc in a magic ring.
2.  Increase in each stitch.  (12)
3.  *Sc in 1, inc*  (18)
4.  *Sc in 2, inc*  (24)
5.  *Sc in 3, inc*  (30)
Change to black yarn.
6.  *Sc in 4, inc*  (36)
7.  *Sc in 5, in*  (42)
Fasten off yarn leaving a long tail to stitch button to front of hat.  Line the button up as pictured and stitch securely to the front of the hat.

Your infant Pokemon Beanie is finished!

If you enjoyed this little free pattern and want to be sure that you don't miss new things coming up, click here  to receive updates.

Blessings!
Reny


Thursday, October 18, 2018

Crochet a Pete the Cat Earflap hat for the little ones!

In our family, we love Pete the Cat, the zany, adorable blue cat with the mismatched shoes!   I have made several of these Pete Amigurumi's for family and friends.  Paired with a Pete the Cat storybook they make a wonderful gift for any occasion.

I found this awesome Pete the Cat pattern on Ravelry and it has served me well. 

So as I was pondering what to make my great-grandson for his birthday this year Pete the Cat came to mind.  Since my great-grandson already has the Pete amigurumi,  I decided to make him a Pete earflap beanie to wear this winter.

I found an ordinary beanie pattern on the net.  This is the one I used.  Then I searched for a tutorial for adding the earflaps.  This site gives simple instructions for adding earflaps, as well a pattern for the beanie if you would rather get the whole pattern from one site.


My next step was to make ears and cut felt for the eyes and nose which I stitched on.  I just winged the ears, but I believe you could probably use the ears from the main Pete amigurumi pattern and use a bulky yarn and a larger hook to get larger ears for the beanie.


Finally, I made the ties.  For these I used the shoe pattern from the original pattern and made the ties the same as the leg pattern but decreased the diameter to 6sc around rather than the 9sc the leg called for.  This makes the ties more flexible.   I then stitched the ties to the earflaps.

The end result is this cute Pete the Cat earflap hat.  I hope my great-grandson will love it!


And I hope you will love it as well!

Happy Hooking!
Reny