The extent of my own Pokemon hunting has been following around my 10 year old grandson, Sam, as he 'taught' me how to play the game. I'll tell you, he's a lot better at it than I am!
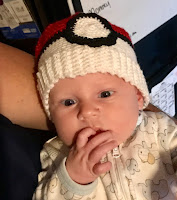
But one thing I can do is make things from yarn! So I designed this adorable little beanie for Bentley. While there are several similar beanie patterns out there, this one was designed especially for an infant in mind. The yarn is soft and a little stretchy and the stitch is close for comfort and warmth.
Here is the pattern, designed for a baby's head.
Before I began, we measured the circumference of Bentley's head and used that measurement as my gauge. The ribbed band on the hat needed to be about the same length as Bentley's head. In his case, that was 16 inches.
This beanie is made from the band upward to the top. I used single crochet stitches throughout. The beanie is made from baby or sport yarn. I just used what I found in my stash so I can't give you a brand name on this. I used a G or 4mm hook. You will also need a yarn needle to stitch on the button and to weave in ends.
Hat band:
1.With white yarn chain 8. Sc in 2nd chain from hook and remaining 6 chains for a total of 7 sc.
2-72. Sc in each stitch back loop only. Chain 1 and turn. Using the back loop on the band is what gives it the ribbed texture and a very neat look. (Your band may need more or less rows depending on your head circumference measurement.) Remember that the stitch count may be different from what I have listed if your measurements are different.
When your band is the length you need put the two ends together being careful not to twist it and slip stitch the ends to one another. Do not fasten off yarn! Turn the band so that the slip stitching is on the inside.
Hat:
1. Now sc in each row of the band to form the first row of the hat. (72) I use a running stitch marker to keep track of my rounds.
2-7. Sc in each stitch.
8-10. Change to black yarn. Sc in each stitch.
11. Change to red yarn. Sc in each stitch.
12-13. Sc in each stitch.
14. *Sc in 7, dec* (64)
16. *Sc in 6, dec* (56)
17. Sc in each stitch. (56)
18. *Sc in 5, dec* (48)
19. *Sc in 4, dec* (40)
20. Sc in each stitch. (40)
21. *Sc in 3, dec* (32)
22. Sc in each stitch. (32)
23. *Sc in 2, dec* (24)
24. *Sc in 1, dec* (15)
25. *Sc in 1, dec* (10)
Fasten off leaving a long tail to sew top closed. Thread the tail onto a yarn needle and weave the tail through the sc stitches of the last round. Pull the yarn tail fairly snug so that the hole at the top is pulled closed. Secure the yarn tail with a couple of stitches inside the hat to secure. Weave in the end.
Button:
1. With white yarn make 6 sc in a magic ring.
2. Increase in each stitch. (12)
3. *Sc in 1, inc* (18)
4. *Sc in 2, inc* (24)
5. *Sc in 3, inc* (30)
Change to black yarn.
6. *Sc in 4, inc* (36)
7. *Sc in 5, in* (42)
Fasten off yarn leaving a long tail to stitch button to front of hat. Line the button up as pictured and stitch securely to the front of the hat.
Your infant Pokemon Beanie is finished!
If you enjoyed this little free pattern and want to be sure that you don't miss new things coming up, click here to receive updates.
Blessings!
Reny


No comments:
Post a Comment