Showing posts with label amigurumi. Show all posts

Friday, October 12, 2018

Crochet Puppy Ornament/toy, Quirky, Unique Handmade Amigurumi


I love searching out new and unique projects to work on!  I found one similar to this on Pinterest and searched in vain for a pattern.  Not finding one, I did the next best thing.  I developed my own.  It's not exactly like the one on Pinterest , but close enough to satisfy me.


I have made this puppy in a larger size, but wondered if I could downsize the pattern to make it more the size for a Christmas ornament.  While it turned out larger than I really wanted, I think it will work just fine.  

Below is the pattern for the puppy.  It is a little involved with the construction of it, but if you follow along closely, you should be able to make it.

For a downloadable pattern with photos plus the pattern for the cat, visit my Etsy shop.


The pattern in my Etsy shop also includes instructions to make the cat in this pic.  I thought they looked like best friends!


Puppy Pattern


This finished puppy is approximately 6 inches long from head to tail.  The size can be increased or decreased by changing the weight of the yarn and the hook size.  A heavier yarn (ex. worsted weight) and a larger hook will give you a larger puppy.  A thinner yarn and a smaller hook will give you a smaller puppy.


Materials:
DK or Sport weight Yarn  (I used Cleo Cotton)
2.75mm or C hook
Safety eyes
Polyfil stuffing
Yarn needle
8 buttons with large holes
12.5mm wooden or plastic beads  (12 of them)  Optional.


Crochet Terms:
CH- chain
ST-  stitch
MC-  magic circle
SC-  single crochet
INC-  increase (2 stitches in one stitch of previous round)
DEC- decrease  (one stitch made over 2 stitches of previous round)
F/O-  fasten off
Repeat instructions between asterisks ** to end of round.

Tips:
Worked in rounds.  I used a running stitch marker to keep track of rounds.  The easiest way to make this puppy is to complete all individual components and then assemble.  My method of attaching the legs requires securing them to the inside of the body before stuffing and closing it, but you could just stitch the leg balls together and then sew them to the body if you like.   If you use my method, be mindful of where you position the legs, as they cannot easily be moved after the body is stuffed and closed. The safety eyes are placed before the head is stuffed and closed.  If you prefer, you can embroider or use felt for the eyes.  Embroider on a mouth and eyebrows if you like.

Head:
 In a mc make 6 sc.
Inc. in each st. (12)
3.  *Sc 1, inc*  (18)
4.  *Sc 2, inc*  (24)
5-17.  Sc in each st.  (24)  Make color change at about round 8.  Place safety eyes at about round 12.
18.  *Sc 2, dec*  (18)
19.  *Sc 1, dec* (12)
20.  Dec x’s 6  (6)
21.  Dec till closed.  F/O

Neck:
 Mc with 6 sc.
Inc. in each st.   (12)
3.  *Sc 1, inc*  (18)
4-6  Sc in each st.  F/O
Stuff neck and stitch open end to bottom of head.

Ears:  Make 2
 Mc with 5 sc.
Inc in each stitch.  (10)
*Sc 1, inc*  (15)
*Sc 2, inc*  (20)
5-7  Sc in each stitch  (20)
8.  *Sc in 8, dec*  (18)
9.  *Sc in 7, dec*  (16)
10.  *Sc in 6, dec*  (14)
11.  *Sc in 5, dec*  (12)
12-14.  Sc in each stitch.
15.  Dec x’s 6.  F/O.
Stitch ears to head in desired position.

Nose:
 Mc with 6 sc.
Inc  in each stitch  (12) Stuff llightly
Dec  till closed.
Stitch to end of snout.

Body:
 Mc with 6 sc.
Inc in each stitch  (12)
*Sc 1, inc*  (18)
*Sc 2, inc* (24)
*Sc 3, inc*  (30)
6-25.  Sc in each stitch.
26.  *Sc 3, dec*  (24)  Attach legs at this point before stuffing.  (See assembly instructions)
27.  *Sc 2, dec* (18)  Stuff body.
28.  *Sc1, dec*  (12)
29.  Dec x’s 6  (6)
30.  Dec till closed.  F/O


Feet top:  Make 4
 Mc with 6 sc
Inc in each stitch  (12)
*Sc 1, inc*  (18)
*Sc 2, inc*  (24)
5-8.  Sc in each stitch.  F/O

Feet bottom:  Make 4
 Mc with 6 sc
Inc in each stitch  (12)
*Sc1, inc*  (18)
*Sc 2, inc*  (24)  F/O

Balls for legs, tail and head bows.  Make 19
 Mc with 6 sc
Inc. in each stitch  (12) 
3-4  Sc in each stitch  (12)
Place a bead inside your work at this point. (Or you may choose to simply stuff the balls rather than use beads.)
5.  Dec x’s 6  (6)
6.  Dec till closed.  F/O

Tail:  Make 3
1.  Chain 15 or however long you want your tail to be.  
2.  Attach a ball to the end of each chain.
3.  Tie the ends of the chains together and attach to the backside of the puppy.

Head bow:  (optional)
 Make 2 chains about 40 stitches long.
Attach a ball to each end of each chain.
Tie into a bow and attach to head.

To assemble and attach legs and feet,  thread your yarn needle with some strong cord.  Thread through one of the holes on a button leaving a length of about 3 or 4 inches for tying off.  Thread through a foot top from the inside with the button resting against the inside top of the foot.  Next thread through 3 balls with the cord going through the center hole of the beads.  Thread through the body at your preferred position for the leg and through the hole of a second button inside the body.  Now, thread through the second hole of the button going back through the body and through each ball, down throuh the top of the foot and through the second hole of the button inside the foot.  You should now have 2 cord ends.  Pull the cord tight and tie into a tight knot to secure the leg to the body.    Repeat with remaing legs.  Now you can stuff the body and close it up.  Also stuff the feet and sc the bottoms on to the feet with all yarn and cord ends tucked inside.

Attach head and neck to front of body.   Add the tail and the bow.  Your puppy is completed. 


Saturday, August 18, 2018

Silly Posable Snake Week 8, Christmas Ornament Crochet-a-long Free Pattern

What's more whimsical than a cute little snake wrapped around the limb of a tree?   Maybe a snake with big bulgy eyes and crazy hair!


  These posable snakes are a favorite around our house when the grandkids come to visit!    Here is the pattern for this guy.


                             Posable Crochet Snake

Materials:
Sport weight yarn
3.5mm E crochet hook
2 bendable foam hair curlers Masking tape
Stuffing
4 or 6 mm safety eyes

This snake is made with a short starting chain and worked in rounds of sc. He can be made as long or as short as you want.
To make this snake posable, tape the two curlers end to end with masking tape. This will also serve as most of the stuffing for your snake.
  1. Chain 7. Sc in 2nd. ch. from hook and next 4 chains. Make 3 sc inc. in next chain. Rotate your work and make a sc in each of next 4 chains followed by another 3 sc inc. in the last chain. Place a running stitch marker to keep track of the rows.
  2. Sc in 7sc. 3 sc in next st. Sc in 6sc. 3 sc in last st.
  3-8. Sc in each stitch.
   9. *Sc in 4, dec.* Repeat to end of rnd.
10. *Sc in 5, dec*  Repeat to end of rnd. sc in last 2 st.
11  Sc in each sc until you reach the length you want your snake to be. 


Stuff head of snake firmly and insert taped foam curlers into the body. Stuff tail of snake before making decrease rounds and closing.

When you have the length you want, begin to decrease sc in the remaining rounds until closed.

Eyes:
With white yarn make a magic circle with 6 sc. Pull circle together and make a 2nd row of 6 sc. Place safety eye in the center of each eye and stitch eyes to top of head. I was not able to secure the eyes with the washer because there was not enough room inside the eyeball, so I secured them with glue. An alternative could be to place 
the eyes as soon as the head is crocheted so the safety eyes could be pushed through to the inside of the head and the washers placed. This is what I will do with the next snake I make. 

Embroider on a mouth if you want and crochet a chain for the tongue and sew on.

The hair is simply strands of yarn looped through a stitch and pulled tight.


He’s a pretty simple little snake and could be embellished in a number of ways. Little horns, spikes or antenna would be cute.

I hope you enjoy this pattern. I did kind of make it in a hurry, so if you have any questions, feel free to contact me and I’ll do my best to answer them.

Blessings!
Reny 


Saturday, August 11, 2018

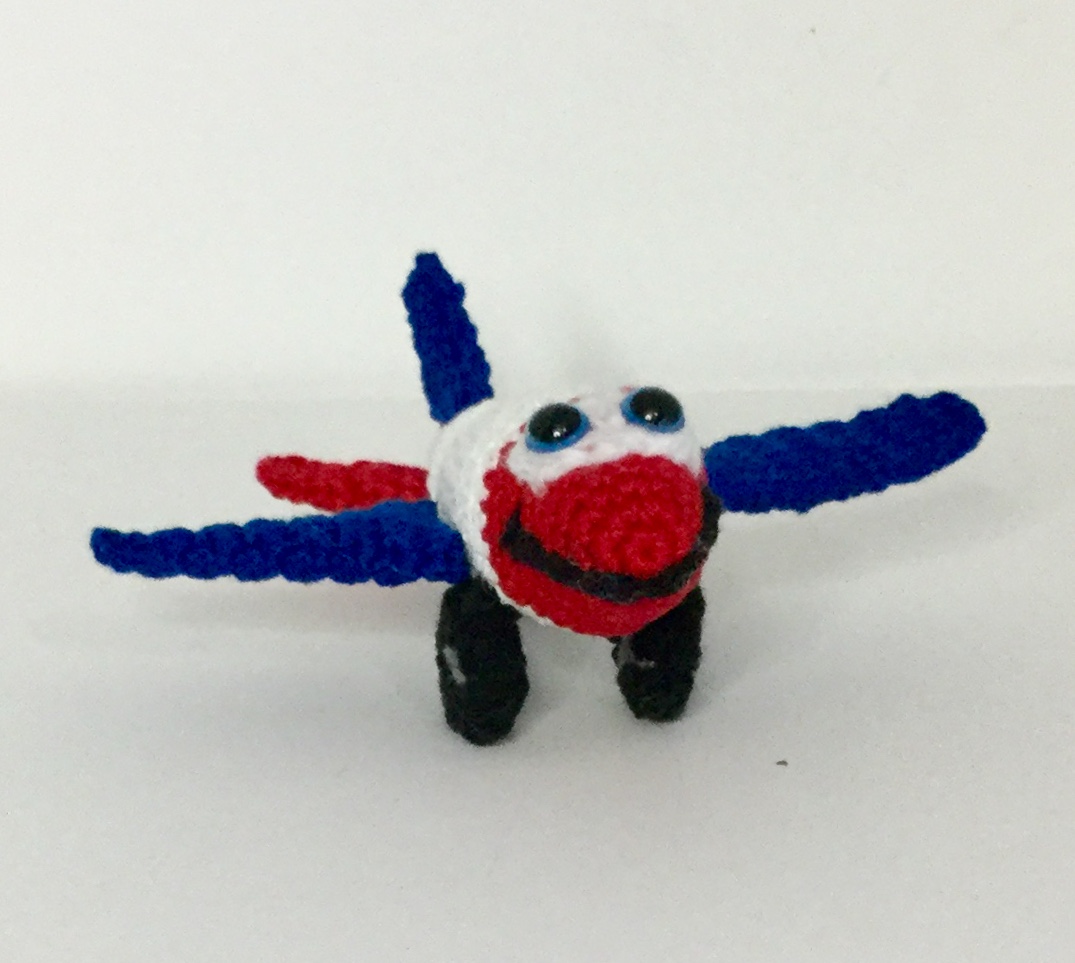
Week 7 Airplane Amigurumi Christmas Ornament Crochet-a-long


     While an airplane in and of itself is not necessarily whimsical,  one with big blue eyes and a sweet smile can definitely qualify.  

     I searched Pinterest for days to find a pattern that I liked.  This one came the closest to what I had in mind and was free!  Thank you Red Heart Yarn!  You can find the free pattern here.


 http://www.redheart.com/free-patterns/happy-little-car-plane-truck


   As a bonus, I also got the car and truck patterns which are included in this pattern set.  I am filing those away for another time.


   This pattern is easy to follow and uses basic crochet techniques.  I was able to complete this little airplane in just a few hours.  I used a 2.25mm hook and sport 

weight yarn.  I wanted him to be small 
enough to make a nice ornament.  He ended up measuring about 5 inches from nose to tail, just the right size!

     I think he will look real sweet flying through the boughs of our Christmas tree this year!  I wonder which of my adorable grand-kids will spy him first!


     The color combinations and facial expressions for this little plane are endless!   I would love to see some of your variations on this project.  Just post your pics in the comments!  

Have fun and be blessed!

Reny

Monday, August 6, 2018

Week 6, Cute Little Monsters Christmas Ornament Crochet-a-long

≠≠≠
 What better way to decorate a Whimsy Tree than with cute little monsters with silly grins and crazy hair. 

In case you missed the beginning of this Crochet-a-long, check out this post for more info.

https://renysplace.blogspot.com/2018/06/christmas-crochet-long-new-ornament.html

This was my very first crochet pattern design and it was so well received that I have decided to offer it again to my readers!
    I absolutely adore bright colors and funny expressions. At our house we call it the 'cuteness factor'.  It is what I strive to achieve in all my varmint creations.  At times this means making several tries before it meets the requirements.  But the satisfaction of finally getting it right is so worth it!

   These little monsters are about 3 inches tall and are just the right size for little hands to carry around.  And I wish I could describe to you the delight we see in every child who has received one of these.  Big smiles, audible giggles as they toss them up in the air or hug them close to their little chests.    The wonder is that such a simple little monster could elicit all that.


    So I invite you to  enjoy this free crochet pattern.  I suggest you make several for adorable Christmas gifts.  And keep some extra's around for little visitors.  I try to do this and it is such a great help to parents when their child has something special to play with during the visit.  And then I send it home with them!


    All you need to make this free crochet pattern are some bits of leftover yarn, stuffing and some felt for the eyes.  Be sure to stitch eyes, arms and legs securely if you plan to give one of these to a baby.


   Once you have completed one, it's hard not to make more.  And the more you make, the more delighted your littles will be!


                                 Giggle Monster Pattern

Materials:
Worsted weight yarn
G crochet hook
fiberfill for stuffing
felt for eyes (or may use safety eyes if you like)
needle and thread to sew on eyes
yarn needle for weaving in ends

   This pattern is worked in rounds and I used a running stitch marker to keep track.  An understanding of basic stitches and general crochet terms is helpful.

    If you are not familiar with how to make a magic ring, this is a great tutorial to explain it.

Rnd 1:  In a magic ring make 6 sc.
       2:  Make 2 sc in each st.  (12 sc)
       3: *Sc in next st., 2sc in next st.* Repeat to end of rnd.  (18 sc)
       4:*Sc in next 2 sts., 2 sc in next st.*  Repeat to end of rnd. (24 sc)
       5 *Sc in next 3 sts., 2 sc in next st.* Repeat to end of rnd.  (30 sc)
       6:*Sc in next 4 sts. 2 sc in next st.* Repeat to end of rnd.  (36 sc)
      Rounds 7 through 11, Sc in each stitch around.
Rnd 12: *Sc in next 4 sts, sc2tog*  Repeat to end of rnd.  (30 sc)
       13 and 14  Sc in each stitch around..
       15: *Sc in next 3 sts.,  sc2tog*   Repeat to end of rnd.  (24 sc)
       16 and 17  Sc in each stitch around.
       18: *Sc in next 2 sts., sc2tog*  Repeat to end of rnd. (18 sc)
        19: Sc in each stitch around.
        20: *Sc in next stitch, sc2tog*  Repeat to end of rnd. (12 sc)
        Stuff your ‘Giggle’ and then sc2tog around until opening is closed. 
        Fasten off and  weave in the yarn end.

   To make the arms and legs visit this website for a great pictorial tutorial. 

   Attach your finished curlicues to the sides and bottoms of your ‘Giggle’ for arms and legs.

   Now, let your creative juices flow as you envision and create unique facial expressions.  I used felt shapes for the eyes and stitched them securely onto the ‘Giggle’.  If you decide to use safety eyes, attach them before you stuff and finish off your ‘Giggle’.  I used yarn to embroider on the mouth.  You can make the face as simple or as detailed as you like.

   For the hair I attached strands of yarn as if attaching fringe.  This tutorial does a great job of showing how to do this.

     So there you  have it!  Happy little monsters that are sure to make you smile!
Blessings!
Reny

Friday, March 2, 2018

I Wanna Make a Cute Doll...

I'm in the mood to make a cute doll, so I'm asking my Facebook friends to help me choose a project.  This is really going to be fun!  Already I have a variety of suggestions with some adorable pics posted on my Yarn Varmints Facebook page. https://www.facebook.com/Renycrochets/   And I am looking forward to more participation in the days to come.

With so many awesome suggestions already posted I'm thinking I may just have to have a drawing of all of them to make it fair.  And to make it easier on me, because, so far, I want to make every one of them!                           

Of course, my sister, who keeps up with everything I am doing, was the first to post!  I just think that these little mummy dolls are adorable!  Way to go, Sis!


My niece was the second person to jump on board!
These little octopi are so cute that I know I will be
making them at some point, either for this contest or
some other occasion.  Thanks Dana!  You have awesome
taste!


This slinky dachshund just intrigues me!  This is another one that
I will probably have to make at some point just for the challenge!
Thanks Lori!  I'm excited about this one!  I happen to know
someone special who would love this!


Who can resist this Raggedy Ann doll complete with dress, apron and pantaloons?  Oh my goodness!  What a treasured heirloom  she would be for some lucky child!  Another future
project, I am sure!  Thanks Cindy, my friend!


These are just a few of the entries so far.   Check back next week to see more awesome pics of potential projects.   On March 10th I will announce which project I will be doing and who the lucky winner will be.  So be sure to choose a project for me and post it on my Facebook page.      https://www.facebook.com/Renycrochets/


Wednesday, February 7, 2018

Babies, Babies, Babies!!!

Babies are such adorable little humans!  Such tiny little beings that just captivate nearly everyone in their immediate environment and cause even the most reserved and proper adult to revert to extreme silliness and gyrations trying to get that cute little baby grin response!

Every few years we seem to get  another one of those cute little critters welcomed into our family.    Since we have several grown up grand-children now, it's always possible that we could have another baby to love and adore!

In preparation for this anticipated event I have been looking at a lot of baby items on Pinterest.   And of course, anything that I make has to be totally cute and colorful!  One of my favorite things to do is to get me some inspiration and then add my own special style in the way of features and colors to the crochet project.

Last week I worked on a couple of teething rings and this week I made a nursing necklace.  I know that most crocheting grandma's like to make booties and blankets, but I'm so much more into different and fun things.
This is the first teething ring I made.    I borrowed the idea from this Pinterest pin 
and then added some cute little eyes and a rattle inside the head.

He turned out so cute that I decided he needed a companion.   So I whipped up this lovely little lady!


And then I ddesigned this  'Little Monster' Nursing Necklace.

The little monster is a Yarn Varmints original character which I  affectionally refer to as a 'giggle' because they just make you want to giggle each time you look at them.  I crocheted him in miniature just for this project.  He is so cute that I think more miniatures are going to be cropping up in the future.

So, who knows what my next project will be.  I have so many ideas that I want to try!  Be sure to check back in often to see whats up at Yarn Varmints.  And if you see something here that you like, you can most likely find it in my Etsy store.  https://www.etsy.com/shop/YarnVarmintsPlus.  

Oh, and I love doing custom items, so contact me if you want a special color or style.  
Have a great and crafty day!
Blessings!
Reny

Wednesday, January 10, 2018

Happy Crafty New Year.....

     It has been a great holiday season!  Lots of time with family and friends, good food and a general feeling of joy and peace!

      But it's a new year with new ideas and creativity.   I wish I could find more time to work on my crochet projects!  Yes, I am retired from my job, but I have so many things I would like to make!  My Pinterest boards are full of potential projects!  Where to begin?  

     My latest original YarnVarmint creation is pretty cute.


This pair of mischievous raccoons took a while to  design.  I ended up changing several of the features and still think I like the eyes on the left one better than the right.  But overall, they turned out pretty good.  They are both made using the same pattern with just a few minor variations.    


     I like that they are not overly big, but just a good size for little hands to hang on to.  Of course they could be smaller just by using a smaller size crochet hook.  This pair were crocheted with a #4 or G hook.  In a sitting position they are about 8 inches tall.

     If you would like to check out my original patterns, visit my Etsy store at: 
           https://www.etsy.com/shop/YarnVarmintsPlus

     Also, check out my Facebook page at:
        https://www.facebook.com/Renycrochets/

     Right now I am working on a couple of projects, one that has been in progress for several months, a kimono for my grand-daughter. It is crocheted in Cleo cotton yarn and has a gorgeous diamond pattern worked into the fabric.  It will be one of the finest garments I have made yet.  The cleo yarn has such a beautiful drape and sheen to it!  I will try to post a pic when it is finished.

 The other is this cute stuffed Pikachu for another grand-daughter. He was a bit of a challenge, even though the pattern is easy to follow.  I have made a couple more of them since this one, and they do get easier and better with each one.  I must say, though, that the tail is quite unique.  It has an armature of plastic canvas to help it keep it's shape.


 Since I have 9 grandchildren and 3 great-grandchildren you can understand why those Pinterest pins will have to wait.  

     All in all, I don't see myself running out of projects any time soon.  But that's OK with me.  I love blessing these kids!  It's my function!

     So I hope your new year will be filled with fun projects and lots of love.  Have a Happy, Crafty New Year!


Saturday, April 30, 2016

Seeing Stripes...

Making a crochet zebra look authentic is quite a challenge.  Lucky for me that my characters are not supposed to look authentic!  They just need to look cute and be easily identified as the animal they are meant to represent.   The fun thing about 'Giggles' is that they are intended to look goofy, silly, colorful and happy.  I invite anyone making these little critters to let your imagination run wild and make something unique!

While I intended the arms to be striped, they turned out to look more checkered.  Interesting.  I did single rows of single crochet on the arms and used 2 rows together on the stripes of the body.  I must remember this in the future.  That checkered effect may come in handy on a different project some day.

I love the googly eyes on this one!  He's a bit cross-eyed on purpose.  It just adds to the 'giggle' factor.


However, I'm just not quite satisfied with him.  Let's see if I can make him look better.  I'll shorten the ears and change the arms.

                    Hmmm,  still not exactly what I want.  Think, think, think!    Oh, I know!


There's just nothing like a big toothy grin to elicit a giggle from even the most somber being.  Leave a comment and let me know which one you like the best!

The pattern for this guy can be found here at Ravelry or at Craftsy.com

Tuesday, April 26, 2016

Gorilla, Gorilla.....


Whew!  This guy really gave me a challenge.  The challenge was to keep him simple enough to be easily done and detailed enough to make him resemble a gorilla.  I repeated the pattern in full twice to be sure my pattern was correct, and repeated different parts of the gorilla several times before I was satisfied with the result.  The giggle criteria was finally met.  He has all the whimsy of my original 'Giggles' and the features of the wild that we expect in a jungle animal.  And with his silly grin, we couldn't help but smile.  'We' refers to my hubby (Mr. Loving) and I.  Mr. Loving is my main 'Giggle' critic and advisor.  His specialty is the 'cuteness factor', and no Giggle pattern get's published without his final approval.  He also helps with the pictures, as photography is not my gift.   Oh, and did I say he is also my main admirer?! Thanks, Loving, for your help and encouragement.   I don't know what I would do without you!


Tuesday, April 19, 2016

A Mischievous Menagerie...

     The invasion of zoo animals continues!  My goal is to design a new amigurumi pattern each week.  Is that too lofty?  Perhaps, but I think I'll still give it a try.


     The stripes on this little guy make him quite handsome!   I hope his friends don't tease him too much for looking a bit like a bumble bee.  ;-)    He looks so cute and innocent, but I do believe he has a mischievous streak.  And I know some of his friends are little pranksters!  I hear strange noises in the night and I suspect this gang may be responsible.


     I'm not sure I trust that Lion and Elephant to behave themselves.  Things may get interesting around here!

Friday, April 15, 2016

Here's a Happy Little Hippo for you!

In keeping with my crocheted 'Giggles' characters, this week I have created the cutest little hippo!
The ears and nose were a little tricky and required a couple of redos, but I am satisfied with the end result.  I really love the color combination on this one!  The pattern can be found here at Ravelry and on Craftsy by searching Hippo 'Giggles' Amigurumi.   So, I now have 3 jungle animal 'giggle' patterns published.  What should I design next?


Monday, April 11, 2016

Wacky, Lovable Lion 'Giggle'

Another silly little 'Giggle' has emerged from my hook this weekend.  He is wacky and lovable and was re-done several times before I was satisfied with him.  Every amigurumi teaches me new things.  This guy taught me several things and almost made me give up!  Putting on the mane was quite a challenge.  I actually removed every strand at one point and started over.  There were also several re-dos on the facial features.  Finally he made me smile, and I knew he was done.   All my 'Giggles' must meet smile or giggle criteria!

So....What do you think?  And what should I attempt next?
This pattern can be found on Craftsy and Ravelry.  Check out my patterns there and leave me some feedback!
Blessings!
Reny

Thursday, April 7, 2016

So Much Yarn......So Little Time!

Well, I've been quite busy the past week with several projects.  I have planned for some time to to crochet a new rug for my bathroom.   I was set on making an oval rug and finding the right pattern has been a challenge in itself.   While this pattern is close to what I wanted, I had to tweak it in several ways to make it suitable for the spot where it will live.  Of course, I started this rug from my yarn stash, but have made 2 trips to the yarn shop already for just the right accent color.  But I believe the finished rug will look great with my brown and blue decor.


Not quite finished, but coming along!


Another project I have been working on in my mind for some time, but am now getting ready to publish as a pattern is this cute little 'Elephant Giggle'.      His trunk is actually posable.  I have it twisted for this pic to show that.    It's amazing how much time and energy goes into even a simple pattern. ( I do try to keep my patterns simple so that even a beginner can make them).  I must have remade those ears half a dozen times to get the effect I wanted.    In keeping with the design of the original 'Giggles' he had to be small, (he's a little over 4 inches tall), colorful and cute enough to elicit at least a smile, if not an outright giggle.   I don't know how many different patterns I will make, but I do have a few more ideas swirling around in my mind.

Thursday, March 17, 2016

Eli the Goofy Goat

I'm not sure what it is about goats, but I love them.    My friend at Grimm Acres has some of the cutest ones!  Visit her website to see some pictures of her goats and other awesome livestock!

Eli is a bit on the goofy side, but I think he is quite adorable.   I especially love the little bit of wool roving I used for his goatee.    I think it adds an aura of 'wisdom' to counter-balance the goofiness.

You can find the pattern for 'Eli' on Ravelry.


Sunday, March 13, 2016

Giggles!


    While working from patterns is very rewarding, there is also great satisfaction in working up my own designs.  I love making cute, whimsical little creatures that bring a smile to faces.  ‘Giggles’ is one of those creations, and I offer this free pattern to all my fellow crocheters.  This little creature is pretty simple and works up fairly quickly.    I think these would make an adorable addition to an Easter basket or any festive occasion.  I may decorate my tree with them this next Christmas.

Materials:
Worsted weight yarn
G crochet hook
fiberfill for stuffing
felt for eyes (or may use safety eyes if you like)
needle and thread to sew on eyes
yarn needle for weaving in ends

This pattern is worked in rounds and I used a running stitch marker to keep track.  An understanding of basic stitches and general crochet terms is helpful.

   If you are not familiar with how to make a magic ring, here is a great tutorial to explain it.

Rnd 1:  In a magic ring make 6 sc.
       2:  Make 2 sc in each st.  (12 sc)
       3: *Sc in next st., 2sc in next st.* Repeat to end of rnd.  (18 sc)
       4:*Sc in next 2 sts., 2 sc in next st.*  Repeat to end of rnd. (24 sc)
       5 *Sc in next 3 sts., 2 sc in next st.* Repeat to end of rnd.  (30 sc)
       6:*Sc in next 4 sts. 2 sc in next st.* Repeat to end of rnd.  (36 sc)
      Rounds 7 through 11, Sc in each stitch around.
Rnd 12: *Sc in next 4 sts, sc2tog*  Repeat to end of rnd.  (30 sc)
       13 and 14  Sc in each stitch around.
       15: *Sc in next 3 sts.,  sc2tog*   Repeat to end of rnd.  (24 sc)
       16 and 17  Sc in each stitch around.
       18: *Sc in next 2 sts., sc2tog*  Repeat to end of rnd. (18 sc)
        19: Sc in each stitch around.
        20: *Sc in next stitch, sc2tog*  Repeat to end of rnd. (12 sc)
        Stuff your ‘Giggle’ and then sc2tog around until opening is closed. 
        Fasten off and  weave in the yarn end.

To make the arms and legs visit this website  for a great pictorial tutorial. 

Attach your finished curlicues to the sides and bottoms of your ‘Giggle’ for arms and legs.

Now, let your creative juices flow as you envision and create unique facial expressions.  I used felt shapes for the eyes and stitched them securely onto the ‘Giggle’.  If you decide to use safety eyes, attach them before you stuff and finish off your ‘Giggle’.  I used yarn to embroider on the mouth.  You can make the face as simple or as detailed as you like. 

Tip: I have found it easier to sew on the face before stuffing the 'giggle'.

For the hair I attached strands of yarn as if attaching fringe.  This tutorial does a great job of showing how to do this.

I hope you enjoy making these as much as I did!  I would love to see pics of your ‘Giggles’ in the comments below.

                                                                                    Blessings!

                                                                                       Reny