Tuesday, March 31, 2020

Free Crochet Sloth Pattern

Sloths are just the cutest things!  Taking life slow and easy in the treetops, they are fascinating to watch.

And, lets face it, we all feel like a sloth at times.  Just don't want to get into any hurry.

I've been working for some time on a cute sloth pattern.  Through trial and error, I worked and reworked the pattern until it suited my idea of what a cute sloth should be.  A sloth that could be a real buddy to any child.


Materials:
  Worsted weight yarn (Dark and light color)
   Size 4mm  (G) crochet hook
   Stuffing of your choice
   Velcro for paws (optional)
   10mm Safety eyes or buttons (or embroider eyes if desired)

Crochet terms:
   MC - magic circle
   SC - single crochet
   Hdc - half double crochet
   Sl. st. - sllip stitch
   Inc. - 2 stitches in one stitch
   Dec -  make 1 stitch over 2 stitches
   Ch - chain
   F/O - finish off
   With tail - leave about a 10 inch strand of yarn attached to                             
    sew components together.
    Instructions between ** are to be repeated to end of round 
   Sc1, inc or number of times specified. 

Notes:
    This pattern is worked in the round.  The head and body are worked in one piece.  When working the arms and legs, stop after the first few rounds and attach the fingernails by pulling the yarn ends to the inside of the piece one nail at a time  and tying them securely together to keep them in place.
Be sure to seperate the ends by leaving a stitch between them when you pull them through.
    I sewed velcro patches to the palms of the paws so the sloth could hang on to things.
    Embroider the nose and mouth onto the face before you attach the face to the sloth.  I also place the eye patches and eyes at this time.
     If you want your sloth to have movable arms and legs, this website will tell you how to do it!  Wish I had run across this sooner!    https://kristitullus.com/blogs/news/tutorial-three-ways-to-attach-jointed-limbs
I like to use a running stitch marker to keep track of rounds.  Now, let’s get started!


Head and Body:
Sc 6 into a magic circle.  (6)
 Inc. X’s 6.  (12)
*Sc 1, inc.*  (18)
 *Sc 2, inc.*  (24)
 *Sc 3, inc.*  (30)
*Sc 4, inc.*  (36)
 *Sc 5, inc.*  (42)
*Sc 6, inc.*  (48)
9-14.  Sc in each stitch.  (48)
15.  *Sc 6, dec.*  (42)
16.  *Sc 5, dec.*  (36)
17.  Sc in each stitch.  (36)
18.  *Sc 4, dec.*  (30)
19.  Sc in each stitch.  (30)
20.  *Sc 3, dec.*  (24)
21. *Sc 2, dec.*  (18)
 Continue on to the body.  You may stuff the head at this point if you wish.
22.  Sc in each stitch.  (18)
23.  Increase in each stitch.  (36)
24- 45  Sc in each stitch.  (36)
46.  *Sc 4, dec*  (30)
47.  Sc in each stitch.  (30)
48.  *Sc 3, dec.*  (24)
49.  *Sc 2, dec.*  (18)
50.  *Sc 1, dec.*  (12)
F/O leaving a long tail. Stuff. Thread yarn needle and weave  through the remaining 12 sc and pull closed.  Secure and hide yarn end by pulling it to the inside of the sloth body.


Face:
 Chain 5  Sc in 2nd ch. from hook and next 2 chains.  3 sc in end ch.  Turn work.  Working on opposite side of chain, sc in 2,  3 sc in last st.   (11)
Sc in 3,  inc X’s 3,  sc in 3,  inc x’s 2.  (16)
Inc 1,  Sc in 3,  inc. X’s 3,  hdc in 5,  sc inc X’s 4, (24)
Sc inc., hdc inc. X’s 2.  sl. st. in next 2,  hdc inc X’s 2,  sc inc. X’s 3,  hdc 8,  sc X’s 6/ (32).
 sc 2,  sl. st.  F/O leaving long tail to sew to head.

Eye Patches:  (Make 2.)
  Chain 6.  Sc in 2nd ch from hook and next 4 chains.  Turn work and sc in 5 chains.  F/O with tail.

Nails:  (Make 12)
  Leaving a 3 inch length of yarn at the beginning, chain 5.  Slip stitch into 2nd chain from hook.  Sc in next 3 chains.  F/O leaving 3 inch tail.  See notes on how to easily attach the nails to the finished arms and legs.

Arms:  (Make 2)
 Make 6 sc in a mc.  
Inc. X’s 6.  (12)
*Sc 1, inc*  (18)
Sc in each st.  (18)
*Sc in 4, dec.*  (15)
*Sc in 3, dec.*  (12)
Place nails at this point.
7.   *Sc 4, dec.*  (10)
8-9.  Sc in each stitch.
10.  *Sc 4, inc.*  (12)
11-24  Sc in each stitch.
F/O leaving a tail.  Stuff lower 1/3 of arm and attach to side of body about 2 rows below neck in the position you desire.

Legs:  (Make 2)
 Make 6 sc in a magic circle.
Inc. X’s 6.  (12)
*Sc 1, inc,*  (18)  
4-5.  Sc in each st.  (18)
Attach nails at this point.
6.  *Sc 1, dec.*  (12)
7-24.  Sc in each stitch.
Fasten off with tail. Stuff.  Stitch to bottom of sloth in the position you like best depending on whether you want your sloth to sit or stand.

HooRay!   Your sloth is finished!  Enjoy!


Blessings!
Reny

Sunday, March 29, 2020

Sensory Cube Review...

Almost everyone I know has a loved one with sensory needs, whether they are impacted by autism spectrum disorder,  ADD/ADHD, SPD or a number of other developmental disabilities or delays.  These children seek and crave any number of tactile and spatial stimuli.  They tend to be very intelligent, super creative and have lots of curiosity.

That's what makes this 'Sensory Cube' so perfect for any child, but especially for those with sensory issues.
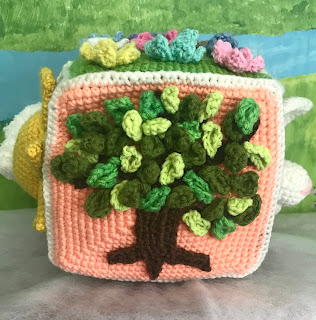
The cube is rather large for small infants, but has a nice carry handle.  Each side of the cube is a 6"X 6" square panel.   Each side features a different dimensional 'applique'.  Each is a different color.  The rings on the handle are made to slide.  A carrot and cloud dangle are attached to opposing corners at the top and I filled these two items with 'crackle' material.

Some of the sides were a bit fussy and time consuming, like the tree.  Each leaf is crocheted individually and then attached to the tree trunk as it is made.  I changed this a bit by doing the trunk separately and sewing it to the panel and then attaching the leaves one at a time to the panel. 


Each flower was also crocheted separately and then attached to the panel.


The cube is assembled after all the square panels are completed.  Although it is not called for, I lined the inside of the cube with plastic canvas squares to help define the shape.   I then filled the cube with polyfill and finished it off.  

The single crochet stitching attaching the panels together adds a nice contrast to all the colors and textures, defining each panel.  I added a cute face to the cloud.  This could be added to the sun and/or apple panels as well.


All in all, it took me about two weeks to complete this project.    I probably worked on it for about an hour each day.

The stitches are easy and the directions are clear.  Except for the repetition of the flowers and leaves, I found the whole project to be quite enjoyable!  

If I make another one, I think I will try to downsize it a bit and try some different appliques' that are not so fussy to complete.  I think one featuring jungle or farm animals would be cute.   Also different yarn textures would be neat, especially for things added to the finished panels.

I considered adding a musical component to the inside of the cube, but with the current coronavirus situation, decided it was not a good time to try to find just the right component.  Perhaps my next block will have some delightful chimes or a rattle inside.

If you would like to make one of these, you can find the free pattern here.   I highly recommend!   Crochet Sensory Cube

Enjoy!
Blessings!
Reny


Tuesday, March 24, 2020

Coronavirus And Crafting


Friends, things are uncertain right now.   While many of us are locked down to prevent the spread of this crazy virus, we finally have the opportunity to just craft!  A crafters dream come true, right?  

Perhaps that's the case for some, but for others this is a time of anxiety and worry.   And there are some legitimate concerns, since the control of this virus depends on the cooperation of everyone.

There will always be those who will not take this seriously and will go about life as usual.  They are not necessarily 'rebels', but they do not understand the ways and means of this particular virus.  We are just learning about this one, and until we know more, everyone is at risk.

So my best advice today is.....stay home.  Make it a goal to use up your stash of 'whatever' so you can replenish with all new stuff when this is under control.  (Our economy will thank you.)

Keep your finished projects in a place or container that will protect it from any surface contamination, as this is a real concern until we know more about how long this virus can live on a surface.

Beyond that, just enjoy what you love doing the most!  Better days are ahead!

Blessings!
Reny


Saturday, March 14, 2020

Guest post....Oh where....is her mojo???

     Hi! My friend, Irene, asked me if I wanted to do a guest post on her blog and I said " why not? ". So, here goes! 

     I am Cindy from CindyB's.  I'm supposed to love crocheting, knitting, sewing and quilting! And I DO!!!!! 

    But, I have lost my mojo! Or is it crojo?, knitjo, or whatever you want to call it?  It's just gone! I've tried about everything to get it back. I tried changing it up a little too! 


     I really admired loom knitted items at the craft shows last summer, so I bought not one, but two loom sets! A 5/8 inch plastic set and a 3/8 inch wood set from CinDwood Looms. I found out, much to my dismay, that I do not like looming! This is definitely not my cup of tea! 

     I am no quitter in this pursuit of my craft mojo!   My friend, Irene is helping me in my pursuit!!!!! "Try beading" she said! Lol! Another friend of mine gave me a lot of her mother's seed beads! Good grief! I can barely see them!  But, Irene is doing her best to help me!  And to be honest, after watching a ton of You Tube videos and her help, I can see the appeal!  And, after trying a few projects, I now know what I like and don't like. 

     For instance, it definitely works best for me personally, if I can actually see the bead!!!   And, with the help of an Ott light and magnifier, I can! 

     There is definitely a learning curve! And with Irene's unending patience and good teaching skills, I am enjoying myself! 

     She also introduced me to the incredible, beautiful and spectacular ladder yarn and how to crochet it into necklaces! Is this my new "Craft"?   Possibly!!!!    But what I really like most of all is spending time crafting with my friend! I'll post a few of my endeavors.

Double Strand Earth tone bead mix
Seed Beads with Heart Pendant
Lovely LadderYarn with Pendant
Beaded Bookmarks


"Thank you, Cindy!  You're a real jewel!

If I find your MoJo, I'll be sure to send it your way!"

Blessings!
Reny

Sunday, March 8, 2020

Hi, my name is Reny and I am.......

...a yarnaholic.  There!  I've said it.  

I don't know when or exactly how it happened.  It started with a few harmless skeins.  Just trying to cope with some difficult situations.  You all know the scenario.  A few relationship hurdles, a house that keeps getting dirty,  those dirty dishes that just seem to multiply, a comfy recliner that holds you hostage.  Just normal everyday things that can combine and haunt you into an addiction unawares, and before long, it's too late to turn back!


I never intended for it to go this far.  But the more I indulged, the more I needed it.  A cute little animal here, a snappy bag there, and suddenly I found myself surrounded by handmade yarny items that seemed to just sit around and chant, "More, more!"


My spare room is filled with totes of yarn.  Beautiful skeins of colors and textures that I just couldn't resist, with the thought of what they could become someday!


 Amigurumi are every where!  They line the back of my sofa and sit on my shelves.   And still, I must make more!


Even my treadmill has a stash of yarn and a hook to keep me occupied while I walk!


Is there any hope?  Can I kick this  all consuming habit?  I don't know.  But now that my dreadful addiction is out in the open, perhaps I can at least live with it with just a little less guilt.

I feel better already!  Just confessing to it takes a weight off my shoulders!  I think I can cope better now!

So where did I put that hook and yarn?  I think it's time to create a new design!

Blessings!
Reny

Tuesday, March 3, 2020

So Many Projects.....So Little Time!


Have you ever been overwhelmed by your own ambition?  I have.  And to be honest, I am most of the time!  There are so many ideas swimming around in my head of things I want to make!


Stephen Dearing

And this guy is soon to get a baby brother!  Of course I have several projects in mind that I would love to make for both of them!


Easter is approaching and we are signed up for a craft show the week before.  How many bunnies and Easter related items should I try to make for that?  


And spring!  HooRay for spring, my old friend!  Your arrival brings a whole different sort of projects that have to do with outdoor tasks as well as a bit of spring cleaning to be done.  Plus, I'm looking forward to some nice outdoor walks, perhaps with  a couple of grandkids in tow!  

And, we will have a wedding to attend in the midst of all else!  

What a lovely time to look forward to!  

So among all the happy times, I will continue to file away ideas of new crochet varmints, bags, etc.  And during the rainy days (and there will be some) I'll attempt to bring some of those ideas into reality.

I hope you are all looking forward to some great times also, but don't get too busy to be creative!  

Blessings!
Reny